

polecat
-
Posts
670 -
Joined
-
Last visited
Content Type
Profiles
Forums
Events
Store
Gallery
Community Map
Posts posted by polecat
-
-
I have enjoyed the odd car restoration in my time and this one looks a lot of fun.
I would say a BMW like that is worth doing and will be a lot of fun when complete

-
Big day Tomorrow ...... MOT

If (when) It passes I intend to over the next few days Fit New mirrors,Stainless steel radiator guard and tank protector.
Just waiting to get it legal and Paint should be Dry enough next week to cut and polish so Any inspections welcoome after next week Fozzie
I Hope there will be no more restorations
 and Mrs Polecat will Double that
-
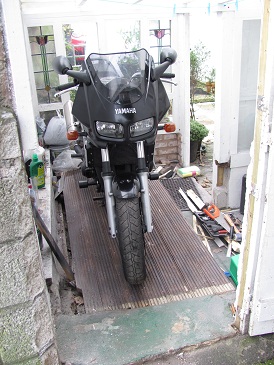
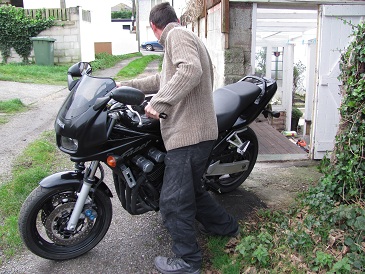
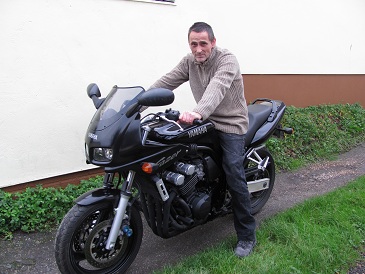
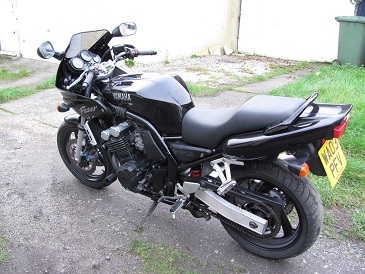
Finished off the fazer today and its 20112011
Refitted the Fuel tank parts last night working after dark So I could not really see the bike too well.
This morning I put the fuel back in carefully
Fitted the old mirrors as the New ones have not arrived and Put the key in and it started first press of the button !!
OUT OF THE DARK AND INTO THE LIGHT
Few photos of the bikes first journey out of the hanger
It still needs a clean (got a bit dusty in the garage) and I am not going to polish it until the paint is about a month old.
Spent the rest of the day trying to widen the entrance to the hanger as it is VERY tight


-
In that case I did not like my number so have changed it

TC - 01
Littlecat - 02
Mealexme - 03
iWannaGoFast - 04
Augustburnsred - 05
Stu - 06
mojo - 07
iiisecondcreep - 08
Susieque - 09
techno - 10
Bogof - 11
rennie - 12
yorbandit - 13
Keith565 - 14
whitedevil - 15
Silverspring - 16
nman1 -17
Rebel Rach - 18
Green - 19
GOG - 20
Bonniebird - 21
Throttled - 22
Tango - 24
Boothy - 25
Voodoo - 46
Decor58 - 58
Polecat - 101
-
Glad you didnt go with the halfords crap, its looking good!
Thanks m8
I have relaxed since painting it and worked out the "Flecks" were coming out of my respirator which seems to be breaking down
Anyway you can only see them if you use a magnify glass,being overly critical of my own work I have decided to stop using a magnify glass
Once I cut it down with compound a bit it will be really nice .... no runs,sags and not too orangy so it could have been a lot worse I am really looking forwards to seeing it on the bike .... but must be patient and let it dry over the next few days

-
The big day arrived and I must say it has been stressing me out slightly waiting for the right weather and trying to decide which final lacquer coat to use.
First off I decided the decals I had put on were not exactly right so I peeled them off and put some diferent ones on

Then This morning I did some test spraying with the diferent lacquers I have collected to check for compatibility/drying times ect.
The Halfords fuel resistant crazed up when I sprayed over it with a second coat on my test piece which put me right off it.
My trusty brand lacquer was like several tins with 20 % left in each so I did not want to risk running out mid flow so I decided to use a Trade brand lacquer I bought (cos it was cheap) I test sprayed my sample and it seemed ok so I bit the bullet and after cleaning over the tank started to spray it.
For some unexplained reason some little white flecks were appearing as if by magic on the surface as I sprayed so when I finished the first recoat And it was touch dry I brushed off one of the flecks and it came off (Not sure where they were coming from )
I gave the tank two more light coats of clear lacquer and then hesitated wether to do another but resisted the urge
Know when to Stop

Anyhow I Left the tank to dry for an hour then moved it into the house (Workshop) to cure a little faster.
While I had a spare hour I decided to dismantle the "Spray Booth" and clean up the consevetory which I found Highly satisfying ,Knowing the painting is now finished was quiet a relief actually as spraying in November is a bit Nuts and very stressful !
Here are a couple of pickys of the tank in its final paint (this is the side where the dent was )
It Just needs a rubbing compound and polish next week when its dry ! but I may fit it to the bike first.
.JPG.a3c76d6ae37ae9574241fe3fefc5d3da.JPG)
.JPG.3c4b9fc6322eda6bc9b7fd92f230f048.JPG)
-
TC - 1/2
Littlecat - 02
Mealexme - 03
iWannaGoFast - 04
Augustburnsred - 05
Stu - 06
mojo - 07
iiisecondcreep - 08
Susieque - 09
techno - 10
Bogof - 11
rennie - 12
yorbandit - 13
Keith565 - 14
whitedevil - 15
Silverspring - 16
nman1 -17
Rebel Rach - 18
Green - 19
GOG - 20
Bonniebird - 21
Throttled - 22
Polecat - 23
-
Today it rained so I was a little put out with my intention of painting the tank so I took it out in the rain and wet and dry sanded it then spent a good 30 minutes putting the decals on
Tommorow I really hope to get the final lacquer on as the forcast is fairly good

I think my new wing mirrors came today but the Postman decided not to use the doorbell and shoved one of them red cards of doom through the letterbox
.JPG.d91282d975cf91f9c7066593b8d22ebc.JPG)
.JPG.e5a2b0ec11265fe56a32a94a7346c57a.JPG)
.JPG.cadb3245e73c26b205dde9ffc6c09708.JPG)
-
Im taking notes down on how you do the painting and get a good finish

Why dont you make your own painting booth?
I was thinking of setting up an area with an industrial fan to provide a constant flow of air in my garage. Or a heated fan with controllable temp so I could get the temp roughly how I need it
Would that work or am I barking up the wrong tree?
Basicaly what you need is a trough full of water at one end of the garage with a canopy which is ducted by a fan and as the air is sucked around the trough it then catches any dry paint in the air and somehow helps maintain a constant dew point (not sure how)
You also need Air fed respirator if using two pack paints (as one should to do it properly)
Heating should be constant and originatiing from the opposite side to the water trough (pretty sure halogen heaters would be ok as you would get the heat and light )
You need all round lighting really and dust proof walls and ceiling (or polythene sheet stapled to walls and ceiling ect)
I Do not intend to do enough spraying to warrent building a spray bay but if I had the space I Might build one for bikes specificaly and Spray bikes for a little hobby / money on the side
-
so that last pic isnt after it had been polished? Wow!
No that is about 30 minutes after second lacquer coat .....
Tommorow I leave it dry then the day after I will rub it down with soapy water and 1200 grit wet and dry then Dry it off and apply decals I will then paint it in a further 2 coats of clear lacquer (or halfords fuel proof lacquer )
So got the day off tomorrow
This job is all rush and panic or waiting for paint to dry
-
Nice one! looks very shiny! I remember something about halfords product that said it protects against fuel spillages, doesnt. It just burns straight through and down to the paint :s
Thanks for that
Wait till you see it cut and polished 
That may be the stuff I just bought
I do not feel confident in it as I said and the more I read, the more likely I will take my chances with fuel spills
-
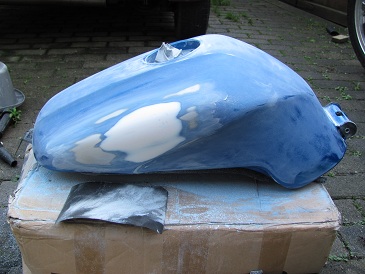
Another exciting (stressy) day in the Project .........
Today was dedicated to painting the fuel tank and was not without its problems
Firstly when I turned over the fuel tank to paint the top I noticed 2 lines where the undercoat had indented while resting on the washing up bowl so I had to spray some primer into the lid and let it go thick,then I used it as a stopper to fill the two lines and rubbed down when dry.
The other problem was when testing the HALFORDS fuel resistant lacquer It "Blushed" as soon as it hit the test piece,this is basicaly where the lacquer goes milky which usually points to the temprature is outside the range of the dew point and the propellant in the tin condensates when it hits the surface.
It was never a problem with my usual lacquer same temprature ect so I left it and in about 15 minutes it cleared,so I am not too sure about it (it would take a brave person to spray this on your shiny tank )
I have also heard of many other problems with this halfords lacquer,like it wont dry,it lifts,it yellows,it blisters the paint underneath
(Will decide later if I use it or not )So I finally took the bull by the horns and sprayed on my 3 coats of base coat which went pretty well really so waited about 20 minutes and then sprayed 2 good coats of my usual clear lacquer,quiet heavy as it will have to be Wet and dryed (Wet) to level the lacquer for decals and top lacquer (Halfords or non fuel resistant )
Just a few photos to give you an idea of the Finish, note the paint is by no means totaly flat at this point and the lacquer coat is quiet heavy for sanding in the final stage.
I am happy with the result of the dent repair as I could not remember looking at the tank which side it was on so had to look at old photos


-
While playing with my Fuel tank (waiting for paint to dry) I decided to paint the fairing frame (by hand) I then refitted the front mudguard, Took the light unit out of the old fairing and the indicators then fitted them to the New one.
I then fitted the New Fairing to the bike also the inner panels and windshield then connected it all up.
BE GONE EVIL BLUE


-
Today I completed the bottom of the Fuel tank
Slight cock up though ...... I decided the only way to paint this ere tank was to paint the underside first then flip it over and do the top when the underneath coats were all dry and finished.
I turned over the tank (fortunatly sitting on a washing up bowl ) and the remaining fuel started to leak through the filler hole on the top side (now underneath ) so hoping that petrol will not melt a washing up bowl, I carried on spraying regardless, I made up my mind as I listened to the petrol dripping into the bowl that If I fancied a smoke I should maby go outside

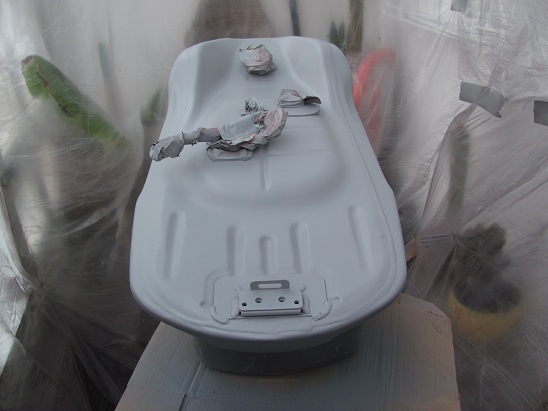
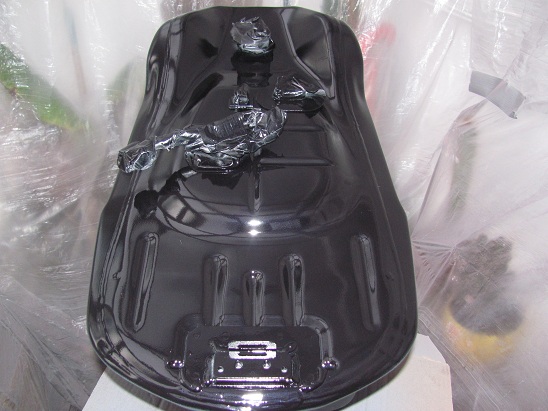
First picture : Final undercoat on the bottom of the fuel tank
Second picture:2nd base coat applied
Third picture : Second lacquer coat
Just for Info ..... You must apply the lacquer coat within 30 minutes of the base coat, so plan ahead !

-
A guy is playing a round of golf with his mate when he hits a wild shot right into a water trap. As he's retrieving his ball he spots a frog sitting nearby. The frog then says "If you kiss me I'll turn into a beautiful Princess, and we can get married and live together for the rest of our lives". The guy picks the frog up and puts it in his pocket.
His mate came down to see what was going on and heard everything. He says to the guy "Didn't you hear that? If you kiss that frog it'll turn into a beautiful princess and you can get married and live together for the rest of your lives! Don't you want that?"
The guy says "Nah.......I'd rather have a talking frog!"
Now that is FUNNY
But this thread is for WORST so tango is disqualified

-
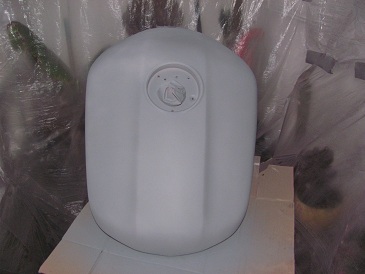
Tank goes into the Spray shop .......
First picture is just to show you my sample piece that I use to spray each coat I do on the real panel, the advantage is you can touch it to know if the real panel is dry and also check for any reaction between coats on the sample rather than your shiney new one.
Tank ready for spraying having been really well degreased with spirit and then gone over with a tack cloth
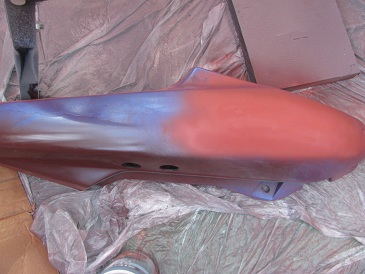
1st coat red primer
2nd coat White undercoat
3rd coat grey primer
The advantage of the three diferent colours is if you need to rub down you can see how far you have gone, ie if you see red after rubbing down the grey then your nearly through the undercoats and need to back off
Final picture is tank all ready for Base coat tomorrow ....... Fingers crossed !
Btw The Fazer tank is a bloomin tricky shape to paint but I can assure you it is all painted underneath as well !


-
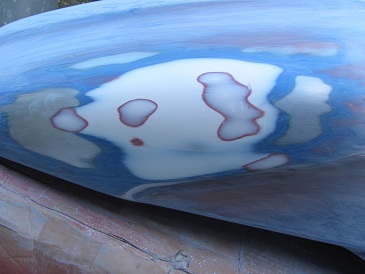
The grits I used for the tank "dry" wet and dry obital sander for the 80 grit then hand sand 120,180,240 and finally 320 grit.
These are some pictures of the dent A-Z So you can see how I approached it.
First sanded off the paint to reveal the shape (high and lows)
then sand it to key the area to fill
tap out the high spots in the top of the dent
Cover dent in larger area of fine 2 pack filler
leave to dry 3 days
sand to shape with orbital using 80 grit
hand sand to 180 grit then Spray the filler with red oxcide and as it drys look for darker patches which show holes in the filler
Fill said holes with more fine filler and leave to dry
rub down again by hand using 120,180,240,320 grit feeling and looking as you go
You need to feather the filler well into the metal and also where you remove paint from the tank (as I did where there were some small paint chips )
Dent disapears wet the area with spirit to see how it looks
Let it all dry ready for paint


-
Spraying Tank day .......
I removed the tank from the bike and emptied out the fuel,then took out the fuel filler andI went to work on the sanding including the dent area.
.JPG.e98242b38a202649ae34e8f8bd0c17e8.JPG)
.JPG.765f55a9afea7035750b484d78965499.JPG)
.JPG.3e4e2057f809acb708a3a17bfd28c28c.JPG)
.JPG.b1129226e1de6a29ab4bdd16885698a5.JPG)
-
Lookin great PC, wish I had your painting skills. Are you painting in a warm kitchen or a cold garage?

Is is a home built conservetory made from glass and wood with a polycarbonate insulated roof (transparent)
So I would class it as a Cold garage with benefits ..... ie It warms up quiet a lot with a little sun on the roof
Thanks for the comment on the painting but can I just say that this Project is all about Home painting a bike on a tight buget.
Although my painting is going ok it is by no means perfect !
You can make it pretty good once you finish by cutting and polishing, but need to have painted a fairly good surface to use this option.
The only way to get a really good spray job is in a heated ventilated booth using a proper spray gun and good quality paint.
I am using a makeshift booth with no ventilation and Rattle cans
The main thing to remember is this paint job is doomed to fail as far as a proper job goes (lack of temprature control, overspray from lack of extraction, cheap quality paints with a fixed spray patten, lack of space to name a few ) so what I am trying to demonstrate is that Anybody can get an adequate paint job on their bike at home for under £150
I spray painted for a living for about 4 years and I Belive Spray painting is 40% equipment and 30% knowledge(how to fix it when it goes wrong is useful) and about 30% Skill
So you are already at a big disatvantage doing it on the cheap to start with
If you gain a fair bit of experience playing with spare panels then anyone can acheive acceptable results using this method in a very short time.
Once I rebuilt an MGB GT and sprayed it with rattle cans "Old english white" on my drive one summer and it turned out pretty dam good to my amazment
-
looking good
I wouldn't mind seeing this in the flesh
It is certainly a nice day out To Cornwall
Your most Welcome anytime
-
After playing with the mudguard for an hour or so I decided to fit the tail piece to the bike to make it easier to polish (you don't have to hold the panel )
The tail went back nice and easy until I noticed that two "fairing fastners" were missing from underneath (must have come off before I got it ) fortunatly I had just bought a packet of them from hEbay which were exactly the right size although meant for a renault car.
I rubbed down the fairing with 1200 wet and dry and once it was dried off I noticed the outside temp was well over 16c so I made a snap decision to slap on the final clear coats (maby a bit rash but I am feeling a bit stressed with the weather situation )
I sprayed a full coat of clear,waited 15 minutes then applied a final coat,waited 30 minutes then rushed the fairing into the nice warm house !
Had to order some bolts for the rear grab handle as they need to be allen type ..... noticed online that the grab handle I bought for £15 on Ebay was £276 on a Yamaha parts site un the UK !! (More evidence of why it was a write off
)Having toyed with the Idea of covering the scatched wing mirrors in Carbon film to make them look posh,I decided to bite the bullet and just buy a new set for £30ish
More than enough for today
Plan for tomorrow is paint the fairing frame and get the tank sanded down and primered up (at least)
Weather outlook ............. Sunny
.JPG.424be7b6038ca95feb9d6ac10e52be62.JPG)
.JPG.9bc09b0b4679ee893dc215d9ddda5d1c.JPG)
.JPG.c2ae9d00d641a81906a9baa5fe8311b8.JPG)
-
Today I Started polishing up the panels......
First useing a cutting compound to remove any surface inperfections and then wax to buff it up.
I discovered that unlike a car it is hard work doing this off the bike so I have decided in future to do all that polishing stuff when it is all fitted back on the bike
For Demonstration purpose I took some photos of the Front mudguard for them that are thinking of doing a simalar job ....
.JPG.77701c470538cf4d4edb483860c8a31a.JPG)
.JPG.25c45c25c7a1c5ede3a77b27d51d3b59.JPG)
.JPG.b03653d1199eae657d4563739dd6b9da.JPG)
.JPG.33e6c04d9f46c4dc55d7385a13863ba0.JPG)
.JPG.4eb730b50c92198701ba5a0989035d25.JPG)
.JPG.534fba0d05d7ab1d2b81b95c897f8a79.JPG)
.JPG.1963f0b6c835498bf2da081391ff66d8.JPG)
.JPG.d1d0361af3df8a7492248bca3e312d8a.JPG)
-
Whats Green and Hard?
A frog with a flick knife
A man saves his wifes life after a road accident by giving her blood
some years later they are going through a messy divorce and she has already had the house and the Harley so he turns to her Lawyer and says" 6 years ago I gave that Bitch my Blood,Now I want it back !!!"
At this his wife pulls out her Tampax and throws it across the room landing in his face "there you are you can have it back in monthly instalments"
Moral of the story is ........you never get anything out of a woman without a string attached
-
Stage 6 : What can go wrong and how to put it right
YAMAHA FZS FAZER 600 "CATEGORY C" RESTORATION PROJECT
in Old Motorbikes, Projects and Restorations
Posted
AAAAArrrrrggggggg Just got back from Failing my MOT
Rear Back Tyre below 1mm in the center
rear back pads less than 1.5mm
headlight aim too low
advisory long travel of brake lever front and back and chain too loose
Anyhoo rather than faff about I just said" Sort it out please" and walked home !
If you leave it where it was MOt'ed then you don't pay for a retest so that was one reason and the other is I did not fancy riding it with a dodgy back tyre
Funny thing about the tyre is it was huge tread except bang in the middle where it was Low then there was a big flat spot with no tread so he suggested someone may have had a BIG skid on it at some point
Anyhoo at least the alignment was bang on and that had been my main concern
Let you know what the bill is when I go pick it up later