Hairsy
-
Posts
410 -
Joined
-
Last visited
-
Days Won
7
Content Type
Profiles
Forums
Events
Store
Gallery
Community Map
Everything posted by Hairsy
-
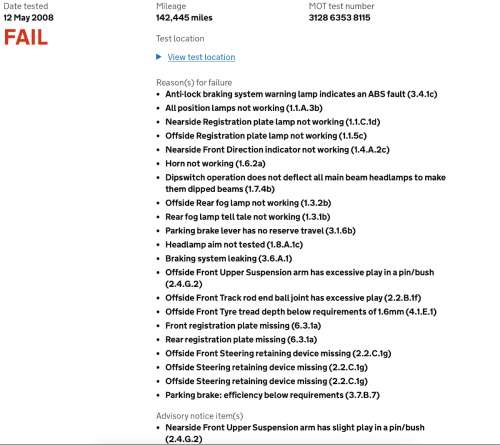
Just looked at one of my old cars - sold it in 2000 I think. Who takes a car for an MoT in this condition?!? Although, to be fair, there's only one advisory.
-
 Easiest thing is to upload to YouTube and then post a link.
 -
Depends on the model - this one has to go under. I chose it mainly for the electronic activation and, particularly, the extent of the airbag coverage. The downside is that, with more coverage, it will probably be hotter, hence my desire to get it to work with a mesh jacket for when the weather is hot. Also the servicing is more expensive than some. In practice, every user needs to choose their own priorities. Based on my research, I'm fairly confident that all the main brands make good units - they just suit different people.
-
Well I've made a decision and decided on an Alpinestars Tech Air 5. The tricky part of the decision is whether it will fit under my summer mesh jacket. I visited a local shop with my jacket and they said it was 'borderline'. I'm not convinced it's that good so I'm prepared to get a second jacket for use with the airbag if I need to. I did get lucky with the actual airbag purchase. I'd planned to buy new but found one on eBay that has apparently been opened but never used. I'll be able to check that when it arrives as the airbag will pair with its app and will show me any logged hours. Buying this one gives me enough money left over to buy a new mesh jacket if I turn out to need one. There's a new version of the Tech Air 5 coming 'later in 2025' which looks good. However I figured that a plan to buy a new model will leave me without any extra protection until it's available. And that's got 'potential regret' written all over it.
-
For routing a wire without taking too much apart, I use an old fashioned metal coat hanger. Unravel it and put a couple of turns of insulating tape around one end to stop it scratching things. Then, through a combination of pushing and bending the coat hanger, route it from the start to the end of where you want the wire to run. Then tape the end of the wire to the end of the coat hanger and pull it back.
-
The link below is a comprehensive insight into the whole thing. There are clearly many pros and cons to different models and, like so many safety items, the best airbag is the one you're actually wearing. I'm currently thinking of the Alpinestars models. Somewhat dependent on whether the person who's been enquiring about buying my last project bike finally comes to have a look and buys. The money for an airbag is currently tied up in the bike. Another factor is how an airbag fits with my current jackets, which range from a nice thin mesh summer jacket which fits reasonably snuggly, through to a quilt lined winter jacket with has room for a thick fleece underneath. But does it have room for an airbag as well? As I say, the best one is the one you're wearing so no point in getting something that's not compatible. Thanks to everyone who's contributed their thoughts - keep them coming as I haven't made a decision yet and I'm finding it to be a complicated subject.
-
Flames while the plug is out is the biggest mystery to me
-
Thanks. My worry with the tether is that I'll forget when I get off the bike. What happens if you do that?
-
I'd really like to hear people's views on airbags? I think I'd really like one but I'd want to make sure that I'd always actually use it. I have summer and winter textile jackets. There is a very big difference in bulk between my summer mesh jacket over a t-shirt and my winter jacket with thermal lining over a fleece. I'd need an airbag vest to suit all my situations. I really don't think I'd want a tether system. I really don't like the idea of a subscription model - it worries me that prices can increase (e.g. if some idiot starts a tariff war on services) or the manufacturer could go out of business (e.g. if some idiot starts a tariff war on products). For those who've bought them, are you happy with your purchase? Do you wear it all the time? What are the real day to day factors that I haven't thought of? And for those who haven't bought them, why not? Are there other factors I haven't thought of?
-
I've adjusted the headlight aim on every bike I've owned - all because they were too low. For the suspicious, every single one has since been through an MoT and I've never had a fail for a headlight being too high (although my Ducati failed for beam shape which was a factory design problem). I've never used the manual's suggestion for how to adjust beam using a wall and measurements. I always set my beam height by going out onto the road when it's dark and making the adjustment so that I get the maximum possible road visible without getting the light high enough to get a reflection from number plates on parked cars. I imagine that many bikes get lights set to a height that's OK even if you have a pillion. I always ride alone and so don't need that contingency built in. But, as we all know, bikes vary hugely in the quality of their lights. My 2017 Z1000SX headlight is way way better than any other I've experienced. And my 6 volt DT50M headlight was an absolute joke. Although, being 16, I probably rode that bike more at night than any other bike I've owned. These days I avoid riding at night if I can but 2 weeks ago I did an hour in the dark. I really hated not being able to properly see the road surface. Scared me.
-
Out of interest, are you able to run a piece of emery cloth between the points and see if clearing the surface kicks it into life? I wonder whether quality of the metal-like-substance that they make them out of could be the issue - in which case, it could be that regular use might be the key to keeping these things alive. I'm not suggesting re-using the pump for pumping duties - just interested in specifically what would make such a new and relatively simple component fail.
-
Learning on a moped w/ AM licence
Hairsy replied to IndigoJo's topic in CBT, Test and Advanced Training Information
You mention that you've had a few attempts at CBT. What has been the most challenging part(s). A moped is an option but it can be quite intimidating to ride modern roads with so little power / speed. At the very least, if you can find a geared 50cc bike then that would help you to develop more of the skills you'll want later. -
This! Chris, I'd personally recommend using the bacon strip to get you to a tyre repairer and then get them to do the job properly with a proper plug. Or, if you can afford to do so, bypass Fiddlesticks' step 14 and just replace the tyre. It's painful to do, particularly as your tyres are quite new, but you'll forget about it after a while and you'll have peace of mind.
-
I had the model before that, the DT50M. Loved that bike. I camped in my garden on the night of my 16th birthday so that I could go out and ride at midnight without waking my parents up.
-
Definitely worth doing. If you've done Bikesafe or one of the advanced skills session then a some of it will be refresher but it's really good to understand the realities of helmet removal and to actually practice it on someone, and also to hear about exactly how to do things right if you're first on the scene. Of course most of it is really obvious when you sit down and analyse it but the reality is that you're not going to sit down and analyse if you turn up to an accident.
-
I went to a Biker Down session this evening. Teaches you some basic techniques for how to deal with an incident if you're first on scene after a bike accident. Lovely bunch of people delivering the course and, somewhat inevitably, lovely bunch of people attending. Highly recommended. http://bikerdown.co.uk
-
Yes, they plug straight in. Although I've actually chosen to set them up with a 3.5mm Y so I can still have the original speakers in place as well. That way I can still have music on short local hops where I can't be bothered putting the earplugs in.
-
In terms of quality of intercom on my Edge, the weak point is the speakers. The mic seems to be excellent at noise cancelling. From about 60mph+ though, the other person can be quite hard to hear through the speakers. Also, as a result of the wind noise you're experiencing, it's almost inevitable that you shout. The solution for me was custom earplugs. This makes the other person super clear and, because they block out most of the wind noise, I continue to speak at a reasonable level. I previously had a 4+ (in fact I still have one) and it worked fine for music but I never used it as an Intercom. The big problem for me was that the design has the volume wheel pointing downwards. I found that I often adjusted my volume when the volume wheel touched my jacket as I was moving my head. It was a right pain! I think the 4X may have the same design. The Edge has the wheel pointing out to the side so the problem doesn't happen.
-
RideWithStyles suggested fuel filter - have you tried replacing that? And when you say that the pump works fine, how do you know? Have you tested the fuel pressure? Final suggestion for now, it's worth researching to see exactly what the sensor does that causes that 'fuel pump issue' code. Is it a pressure test? Or perhaps an electrical continuity issue? It always helps to understand the actual thing that the relevant sensor is measuring.
-
1990 CBR1000FL...Sat for 14 years, alone....
Hairsy replied to Egon247's topic in Old Motorbikes, Projects and Restorations
Congratulations. I had my 2017 day-to-day bike MoTd today and even that's a little nerve racking. I know exactly how it feels sitting there waiting for the verdict on your project. I don't think I've ever had the gear lever right first time! -
Asking price is £2,400 but happy to knock off £100 for one of my friends on here. This bike was the subject of my restoration thread on here so you can see a full description and details of the work that I did on the bike - link here. My Gumtree Advert, including a slightly shorter summary, is here : https://www.gumtree.com/p/ducati-motorbikes/ducati-st2-1998-944cc-sport-touring-low-mileage-recent-restored-new-tyres-factory-panniers/1494760515 Drop me a message if you're interested and I'll happily answer any questions. I really enjoy riding the bike so, within reason, I'd be happy to deliver the bike if the cost of my return journey is covered.
-
1990 CBR1000FL...Sat for 14 years, alone....
Hairsy replied to Egon247's topic in Old Motorbikes, Projects and Restorations
Looks fantastic. Lovely bit of kit. You must be well pleased. -
Here you go - special treat for you old lot ...
-
Just not buying an ADV like so many others...
Hairsy replied to Simon Davey's topic in Motorbike Chat
Get a rubbish one - it’ll still be smoother than a twin!