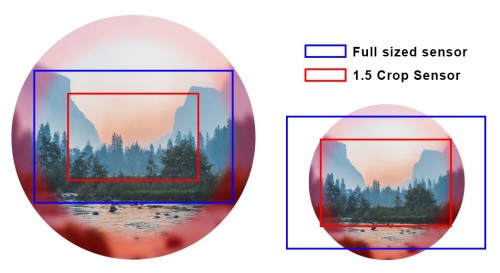
I would argue that Aperture Priority mode is the go-to for almost anything. Now, I should probably clarify that I personally prefer to go all manual at all times (and my camera choice somewhat reflects that), but that's largely because doing so is workable for the types of photography that I tend to do in my spare time. But, in all the time I've worked in the Photography industry (which is my entire working life), it's been common practice among almost all of my peers to rely on Aperture Priority for the majority of the time. Of course, shutter priority seems like the logical choice if you need to ensure a fast shutter speed - after all, you can dial in the speed you're after and let the camera do the rest. But, this can lead to failed exposures when the camera cannot use a wide enough aperture to achieve your desired exposure. The range of flexibility available to the camera in shutter priority is quite limited when compared to aperture priority, and the more basic the lens the more likely this is to be the case. And of course, even if you're using a lens capable of impressively wide maximum apertures, there is a high likelihood of the camera using a setting that offers less depth of field than your desired shot would require. Whereas, even the most basic camera bodies have a fairly colossal amount of flexibility at their disposal when it comes to varying shutter speed - and it doesn't vary according to the lens. Achieving the fastest viable shutter speed in any given lighting scenario is far easier when you can just dial in the minimum aperture that will work for your desired shot, the maximum ISO that you are comfortable using (and I would encourage being very realistic about just how much it matters that your image is noise free at 100% crop...), and then allow your camera to fill the gap. Just like that, you have the maximum viable shutter speed and a perfectly balanced exposure under any setting. Better still, on an SLR you don't need to check the screen to confirm an optimal shutter speed was used - if the actuation of the mirror unit is too slow for your liking, you know that maybe a further compromise on Aperture or ISO is needed. Clarification on ISO: (For context: things on the left of each scale mean less light is making its way into the final image, and so if you're off to the left on one scale you'll likely need to be off to the right on at least one of the others) ISO is the third thing you're balancing in any exposure equation - it's the light sensitivity setting of your camera's sensor. Higher sensitivity settings will allow you to use higher shutter speeds without having to shift your aperture, and vice versa. But in trade off, your images will have more noise/artifacting (or if your camera has noise reduction switched on, which I do not recommend, it'll get increasingly blurry). This comes in two forms; luminosity noise (i.e. grain), and color noise (pixels of incorrect color, often giving darker areas a weird magenta/blue tint). Of course, there is one scenario where Shutter Priority does still have the edge, and that's panning shots or other shots where you specifically want/need a certain degree of length to the exposure in order to achieve a desired effect. In these scenarios, yes, shutter priority is clearly the only way to go as all other exposure modes (besides Manual) offer no guarantee of the desired outcome. But within the greater scope of ways that one might use the camera, Shutter Priority has a far smaller niche of applications. Furthermore, Aperture Priority has the nice little benefit of forcing you to really think about the impact that different depths of field will have on the final image, something that translates incredibly well into using Manual once more comfortable with the effects your camera can achieve. [mention]Troy[/mention] if you're aiming to recreate the look of that stock image you shared, you want a high shutter speed so as to freeze not only the motion of the subjects but also a relatively sharp (or at least, not motion blurred) background. A panning shot isn't going to give you this effect. You also don't want too high of an aperture so that the background is defocused as seen in the example. Luckily, these go hand in hand - a low aperture will in turn grant flexibility to use a higher shutter speed. Also, it looks like in that image they've thrown the focus a little in front of the family; you can see how the child is sharper than the parents, but more telling is when you look at the floor. Focus continues to be relatively sharp up to the bottom of the frame, whereas it falls off incredibly rapidly behind the parents. Focusing just in front of the subject like this is a great way of maximising focus fall-off behind the subject, so long as you know for sure that the subject will fall within the depth of field of your chosen aperture. The spot in the sand roughly half way between the woman's feet and the child's feet looks like the sharpest spot, which suggests that the camera was either pre-focussed (manually) here and then the shutter released as the family reach that spot, or the camera's AF spot was relocate to there. Either way, in a set-up shot like this, focussing where you want the model to be when you take the photo, rather than on the model themselves, is a great way to set up a shot like this. As far as the issue you describe with sharpness falling off to the edges - as JRH says, all lenses are sharpest at the center of the frame, with falloff towards the edges. However, use of higher apertures doesn't just offer greater depth of field - it also combats this. Furthermore, wider lenses are far more prone to this issue. And the fact that one of the lenses you have (the 18-55) is designed explicitly for use on the sensor size that your camera has (1.5 crop) whereas the other two lenses you own are designed for a full sized sensor is going to be another consideration - the softer parts of the image circle cast on the focal plane by your 70-200 and 70-300 aren't even going to be overlapping the sensor, and so fall off in sharpness likely won't be much of a concern for these. In contrast, the 18-55 has some pretty severe fall off at the wide end. To clarify: The left circle represents a lens that has been designed for use on a full sized sensor, like your 70-200 and 70-300. The right circle represents a lens designed for use on a crop sized sensor, like your 18-55. And of course, your camera has a crop sensor. As you can see, in order to cater for the larger sensor size, a lens has to cast the light over a much larger area. What this means is that the less-optimal parts of the optics around the edge of the lens (the bits I've tinted red) fall way outside of the sensor itself when used on a crop sensor camera. Whereas, when you use a lens designed for a crop sensor on a crop sensor camera, you can see that the light is cast on the focal plane over a much smaller area. The red (soft) areas are now inside the frame! This is why crop frame lenses often appear lower quality than full frame lenses when used on a crop sensor camera; you aren't using the lower quality parts of the optics! When used on a full sized sensor they'll start showing their shortcomings. And of course, if you use a crop lens on a full size sensor, the image circle doesn't even cover the whole sensor. On a Canon you just plain can't use a crop lens on a full frame sensor body, and on a Nikon it'll automatically crop the images to remove the areas outside of the image circle (effectively making the camera into a crop sensor, but also losing a lot of resolution at the same time). So, a few thoughts on recreating that shot: - Compression of depth and perspective (well, lack thereof) indicates that it's clearly a wide shot, not a telephoto. Avoid the 70-200 and 70-300, and keep at the wide end of your 18-55. You won't have to stand too far back if shooting at 18mm, which will have the handy side effect of shortening your depth of field and making it easier to throw the background out of focus. - A high shutter speed is going to be key to getting a background that is free of motion blur like your example, so consider trying Aperture Priority mode and setting a reasonably high ISO so that the camera can automatically pick out a nice high shutter speed. If it doesn't work out, try a slightly higher ISO (within reason). - To create that kind of depth of focus you'll need a relatively low aperture. But, too low on the aperture and you'll see that focus fall off at the edges of the frame - instead of having the aperture wide open at 3.5, close it up a little bit (5.6 or 8). This will bring more of the background into focus, so experiment with focusing on the ground where you expect the subject to be at the time when you take the shot, then manually bringing the focus ever so slightly closer to the camera. A tripod is handy for this so that the camera doesn't move after you've set up the focus. - That sample has absolutely had a lot of post production work done. There is flat out no way the child's face would be that well exposed - as bright as the sand - when he has his back to the sun while the sand is catching direct sunlight. Unless using flash, but there are no hallmarks of this in the images (the shadows being the big clue). Also the child's skin tone and color is wildly different to that of the parents, and it looks like he may even have a slight halo around the left side of his face (his left, our right). Looks like someone either used a highlights dodge or a levels correction to brighten him up, a curves or midtones dodge might've achieved something that looked a bit more natural. But tl;dr: don't assume that a result like this is ever possible straight out of the camera, stock images (like all of the internet) lie.