linuxrob
-
Posts
346 -
Joined
-
Last visited
Content Type
Profiles
Forums
Events
Store
Gallery
Community Map
Everything posted by linuxrob
-
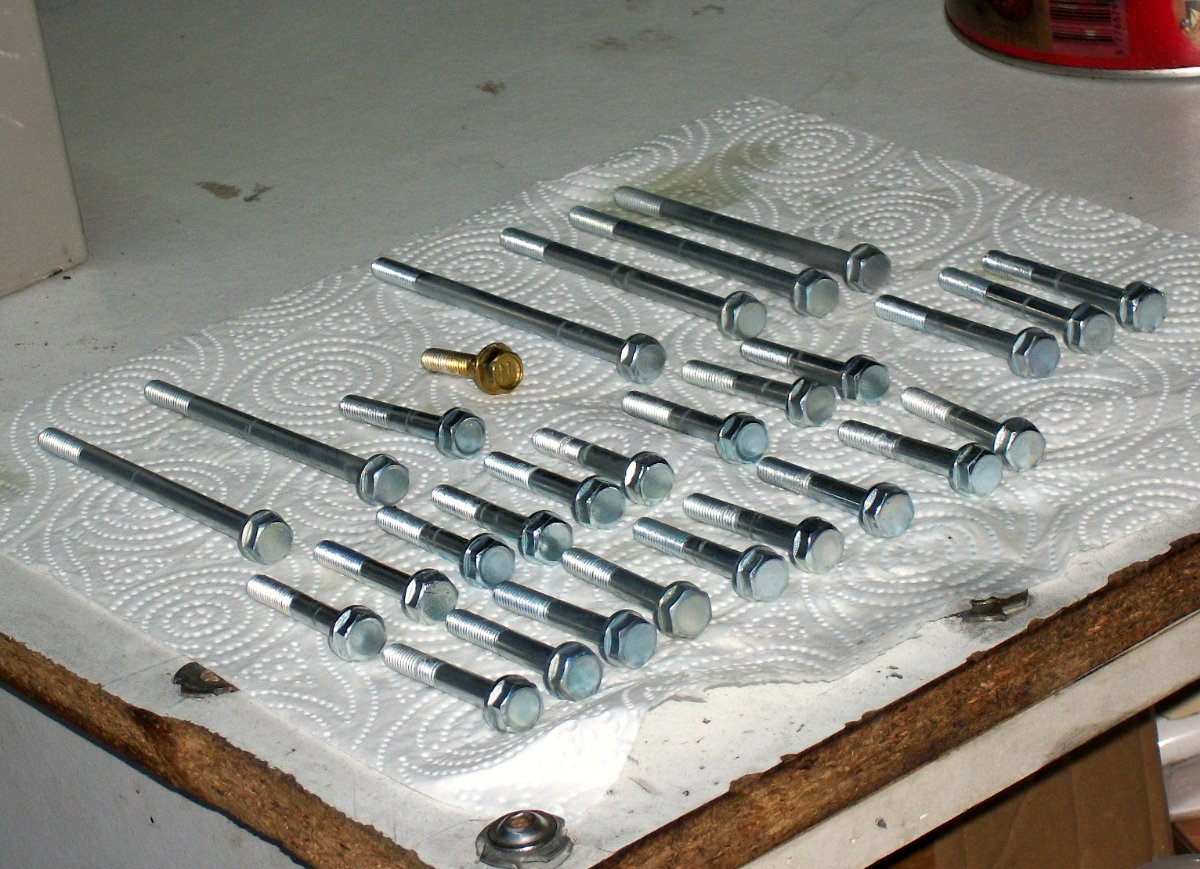
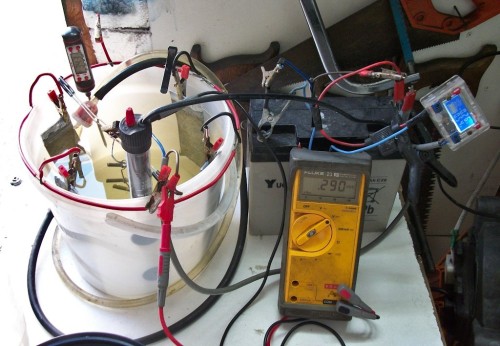
One of the many jobs to do on my Z500 is to replate all the bolts. Full overhaul going on here:- https://themotorbikeforum.co.uk/viewtopic.php?f=87&t=68312 Have done a few bits with my Epson Salts and Vinegar plating tank, see here:- https://themotorbikeforum.co.uk/viewtopic.php?f=87&t=68482&hilit=zinc+plating Reached the limit of what this system is capable of and never got consistant or shiny enough results. I moved on to commercially available chemicals from Gateros Plating now just outside Lincoln (other plating kits are available). I got the mix for my 5 ltr bucket ( Zinc Chloride, Ammonium Chloride, Maintenance fluid, anti foam agent and brightener ) while was there I got their Zinc Anodes as opposed to the thin ones on Ebay. They work out roughly the same price and as they smelt them in house they are 99% pure. The rest of stuff I already had i.e. PSU, heater, small circulator pump, degreaser bath and passivate solutions etc. First bolts to do were the Crankcase bolts. They are Hi tensile bolts so not using any acid pickling (more of a chance of hydrogen embrittlement). The bolts were in a reasonable condition but dull. First a wash in thinners then a buff with the wire wheel followed by a bath in my degreaser of choice, Surfex HD @10% strength @ 60C in my shed slow cooker. After a good rinse from the rain water barrel in to the tank @28-30C for 50 mins, turned at halfway point. Did 3 bolts at a time at a current rate of 100 Ma per Square inch of bolt. From my spreadsheet I need to flow approx 500 Ma for all 3. Rinsed and into the blue passivate @20C for 15-20 sec, rinsed again and dried with hot air gun. Took some pics of the setup and the finished bolts. My cheap PSU is spot on current wise as read by my Fluke 77 meter but the voltage is a bit lower on the power supply than by the multimeter but that's not an issue the current is the important thing to do these 3 bolt it only took 0.26 volts to flow the 500 Ma needed. Once up to temp the small aquarium heater was turned of as the plating keeps it warm enough all afternoon. I have done 30 bolts so far over the weekend and have not had to put any more brightener in from the 2 capfuls to start with, this needs adding from time to time when the plating starts getting a bit dull. The anodes have hardly lost a thing so far, I remove the anodes rinse and store in a dry container between plating. The devil is in the detail as they say. For good results no matter what solutions you use the cleaner the part the better the plating. The cleaning is the most labour intensive bit. Good rinsing to stop cross contamination of the solutions is imperative as is the wearing of rubber gloves and a well ventilated area. My painting mask and glasses are on and leave the shed door wide open and have the bench with the plating bath almost fully outside. some pics below The setup Final result from Saturdays and Sundays plating. Sorry for the long post Rob B

-
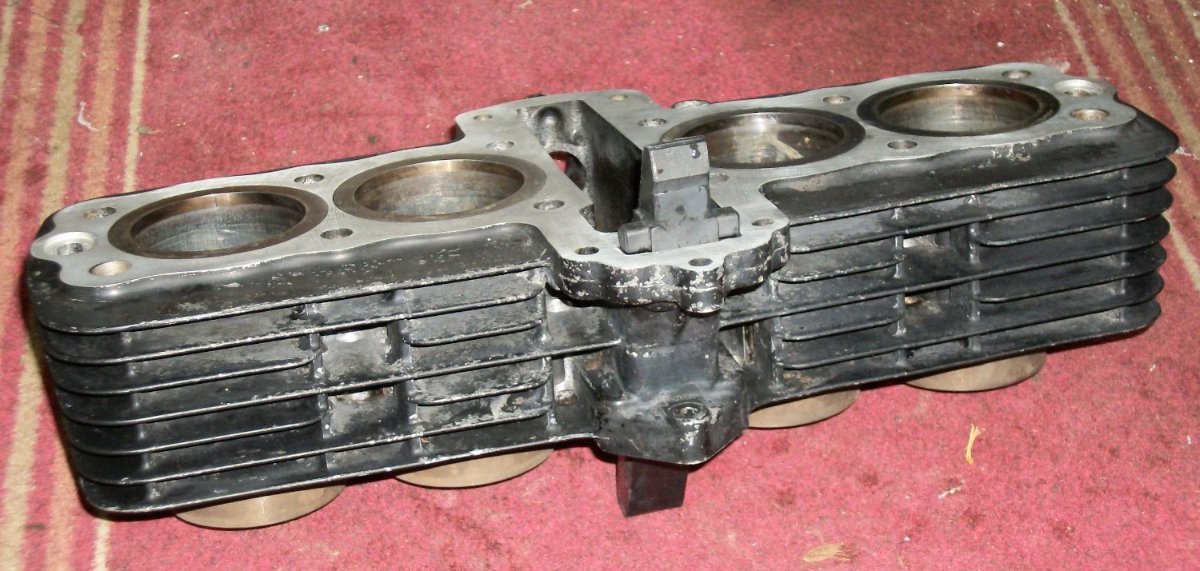
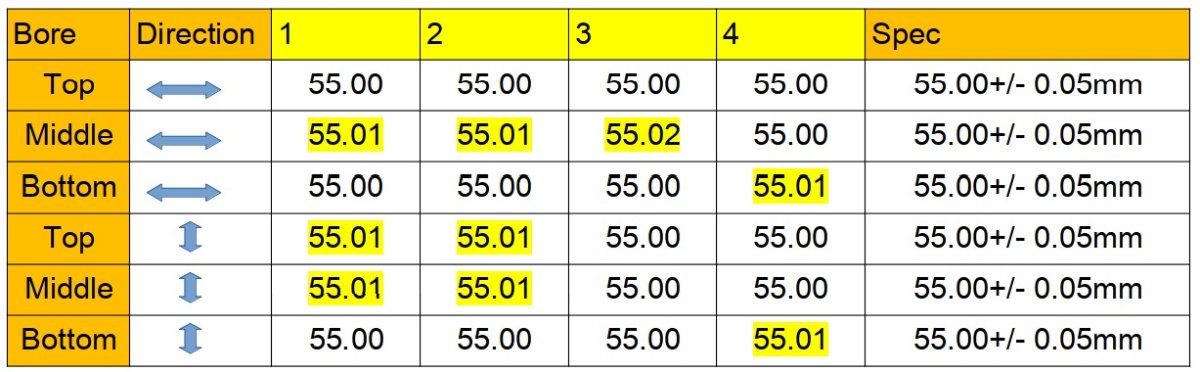
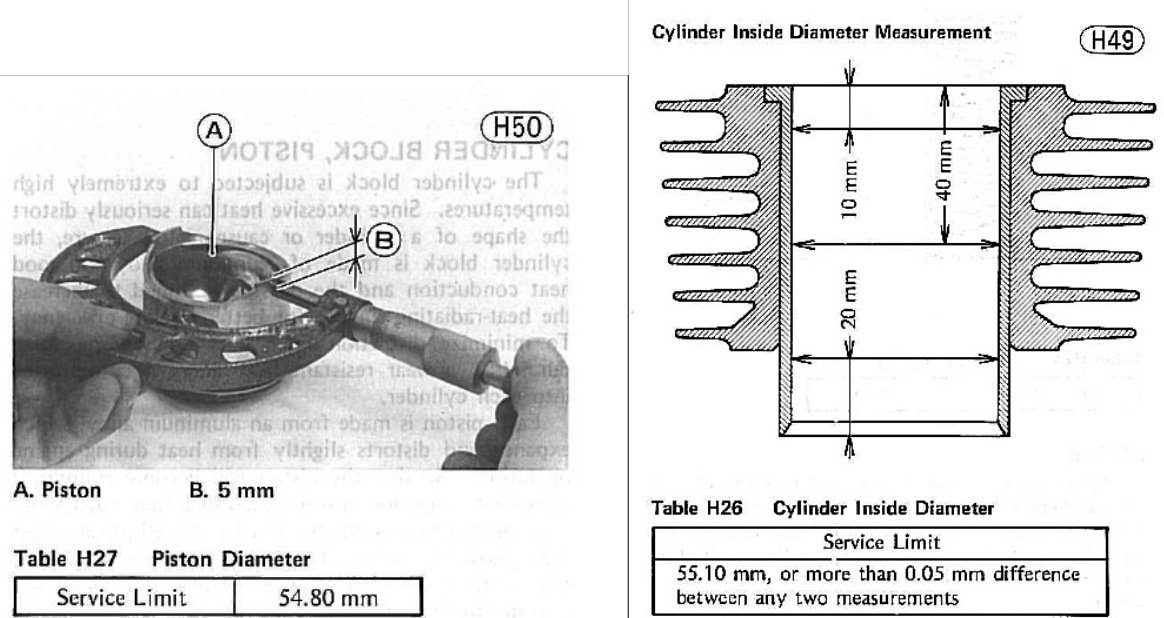
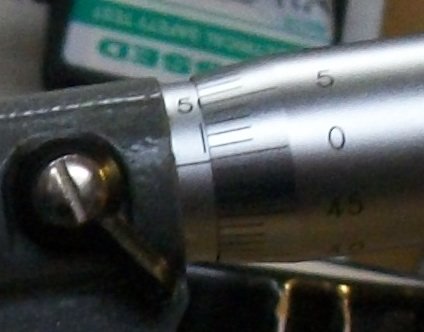
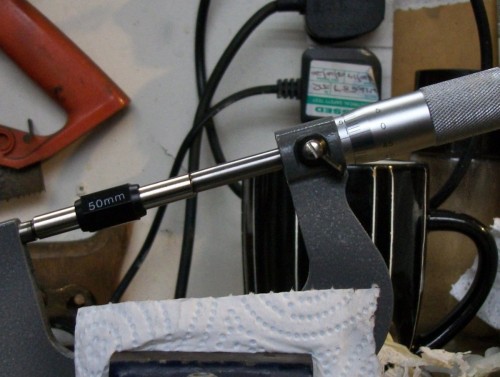
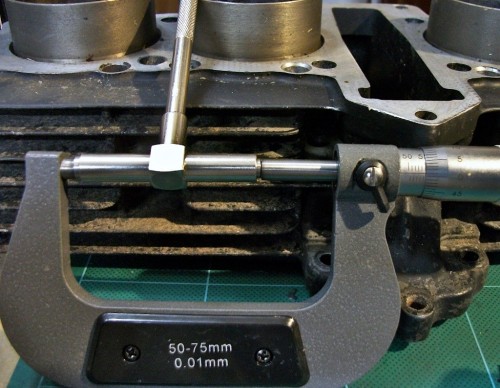
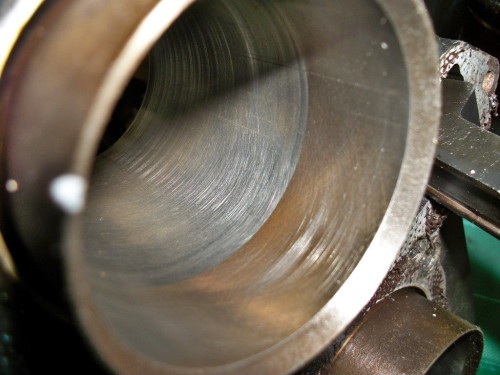
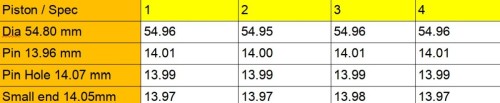
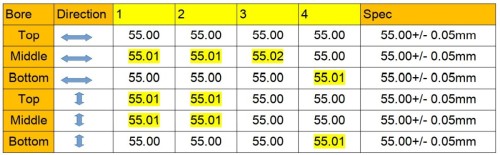
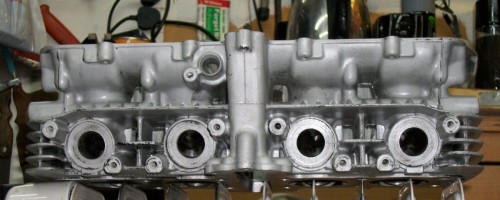
 Barrels next First job was to make sure my micrometer as reading OK, so out with the std 50mm bar and:- Perfect From Fig H49 in the manual (see above) Measurement are taken in 3 places, Top (10mm down bore), Middle (40mm down bore) and Bottom (10mm in from base of bore, unworn part). Both front to back and side to side measurements are taken at the above places to check for an oval bore. Above is No 2 cylinder bore marks, the worst bore and No 4 side to side bottom measurement showing 55.01mm. Then i mic'd the pistons and gudgeon pins After making sure that the pistons – rings and bores were within spec and round enough it was time to prep for painting. I decided to just use soda blasting to clean the flaking paint and oxide build up as :- A: The more aggressive media took an age to clean out of the head. B: I did not want to accidentally blast he cylinder bore surfaces. It took about 2 hours to get enough of the paint off to have a good keyed surface. A good wash in hot soapy water, final clean hot water rinse and blow dry with the airline was followed by a smear of thick gear oil on the bores to prevent flash rusting. Painting next
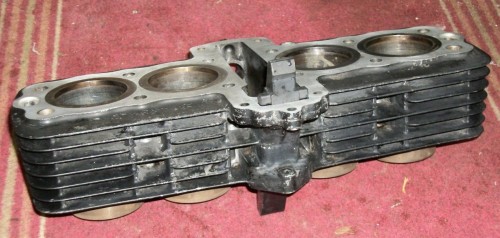

-
When I used bar muffs I had to fabricate something to keep them rigid as they were interfering with the brake and clutch levers, so me personally wouldn't go down the route again These have a semi rigid collar to get your gloved hands in and out easy, I did have a concern about the Front brake getting pushed on but even at 45 MPH+ the cloth does not push on the lever at all, it does take up a bit of the free play on the clutch lever though but not a problem. I do use a few reusable cable ties to keep them in position as the cloth strands are not up to it. Hope you are doing OK, Regards rob B
-
I highly rate bar muffs in the cold - I have them on the CG commuter. I wear summer gloves all year round now without getting cold hands. The drawback is that they look crap. Yeah - well, I'm not exactly a picture of elegance myself so looks aren't the key issue. Well. I do rate them for keeping my hands a bit less cold. Yes they look crap. Had a set of tartan ones (thanks Mum, what else do you get for your motorcycling sons 18th) on my 400/4 late 70's and they looked crap but i could still feel my fingers and therefore concentrate on the fun bits of riding. They really help keeping the limited heat from the Chinese heated grips, without the muffs anything over 30MPH the wind cools them too much. here they are and now 15W and only £3.28 wow order now for next winter!!! https://www.ebay.co.uk/itm/12V-Universal-Motorcycle-Motorbike-Handlebar-Warm-Heated-Grip-Kit-Jx/143367100549?hash=item2161585885:g:18wAAOSwbn9cxmmr These work very well and heat up within 20 secs, the wires are too thin really they lose about 1.0V in the short run so around 2W wasted in total, also I used an inline 5A fuse and better heatshrink that actually shrinks more to grips the elements to the bars. I use 2 x 10W LED Aquarium lights on the front as DRL and LED tail and clock lights to keep the generator load down, with all on it is around the same as with the 35W candle headlamp on but a greater chance of the people who do take the bother to look of seeing me. looks a mildish day today so will be in the shed with th Z500. Rob
-
Not today exactly but...... Last Saturday (9-02-20) before the real nasty weather arrived it was the February meeting of the North Yorkshire VJMC club at the Black Bull in York (11.00 - 13:00). I had hoped to go down on the GS125 for the Dec and Jan meeting at this new venue but weather put a stop to that. "Go in the car" my better half said, but no I would not feel right turning up in the 20 year old Focus to a Japanese bike meeting. Anyhoo, after my early morning shift I gave the GS a good spray with GT85, got layered up turned on the 10W £4.99 Chinese heated grips and off I went. Head wind on the way down had me sub 45 MPH and had to to stop every 10 miles to clean the salt spray of my visor. 54 miles later. Great meeting and a lovely small breakfast, had a pleasant tail wind and dry roads on the way home. A little over 125 miles to the gallon, not bad. Hosed the bike down when I got home and lightly sponged down my jacket, boots and trousers. Spent Tuesday day giving it a good wash, while the breeze got rid of the water my drying towel could not get to I took the chain off. Before After First cleaned in diesel followed by a dunk in old engine oil warmed in an old deep fat fryer. This non O-ring chain takes quite a lot of effort to look after through the winter. After a drip dry gear oil was applied with a clean toothbrush then refitted. All set to get filthy again as the wind and rain continue. Will be posting more of the Z500 refurb in the projects section soon Rob B

-
Yep on Grandstand, me and me dad glued to it, Dave Bickers, Vic Eastwood? and Murray walkers genius commentary, all Greaves and BSA's i think. Then there was the wrestling at 4:00 on Tyne tees. Kent Walton commentary?
-
Cheers Bob, this is the first time i have been able to fully document a full strip and rebuild. I have had many a bike in bits over the last 40 odd years and it is good to record all the jobs. Did a small thread on my Bandit 53000 mile tidy up a few years back, will repost it here I think. Rob B
-
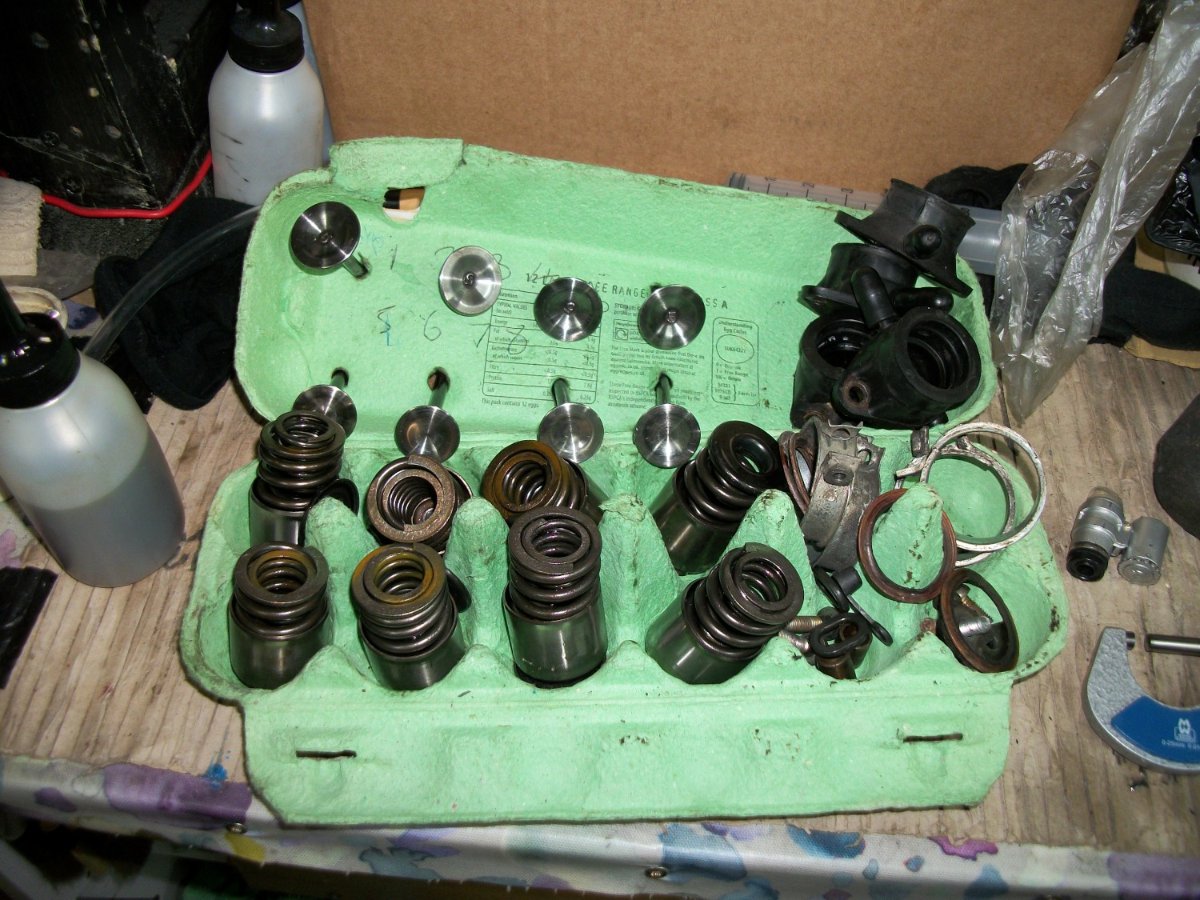
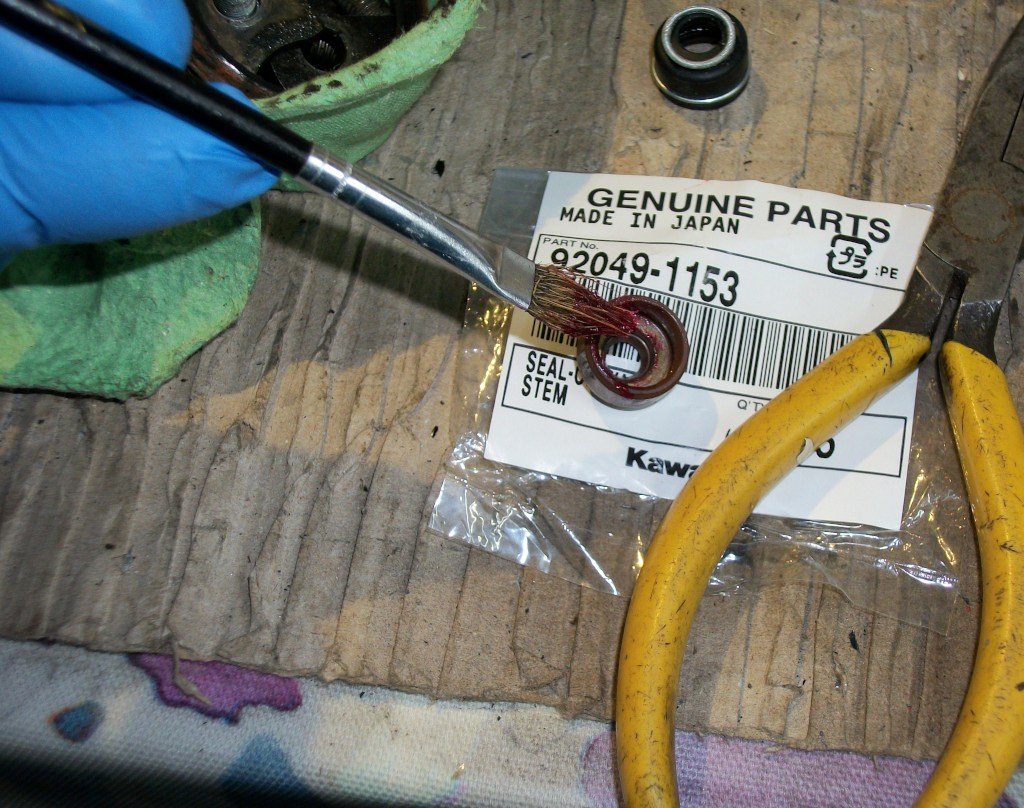
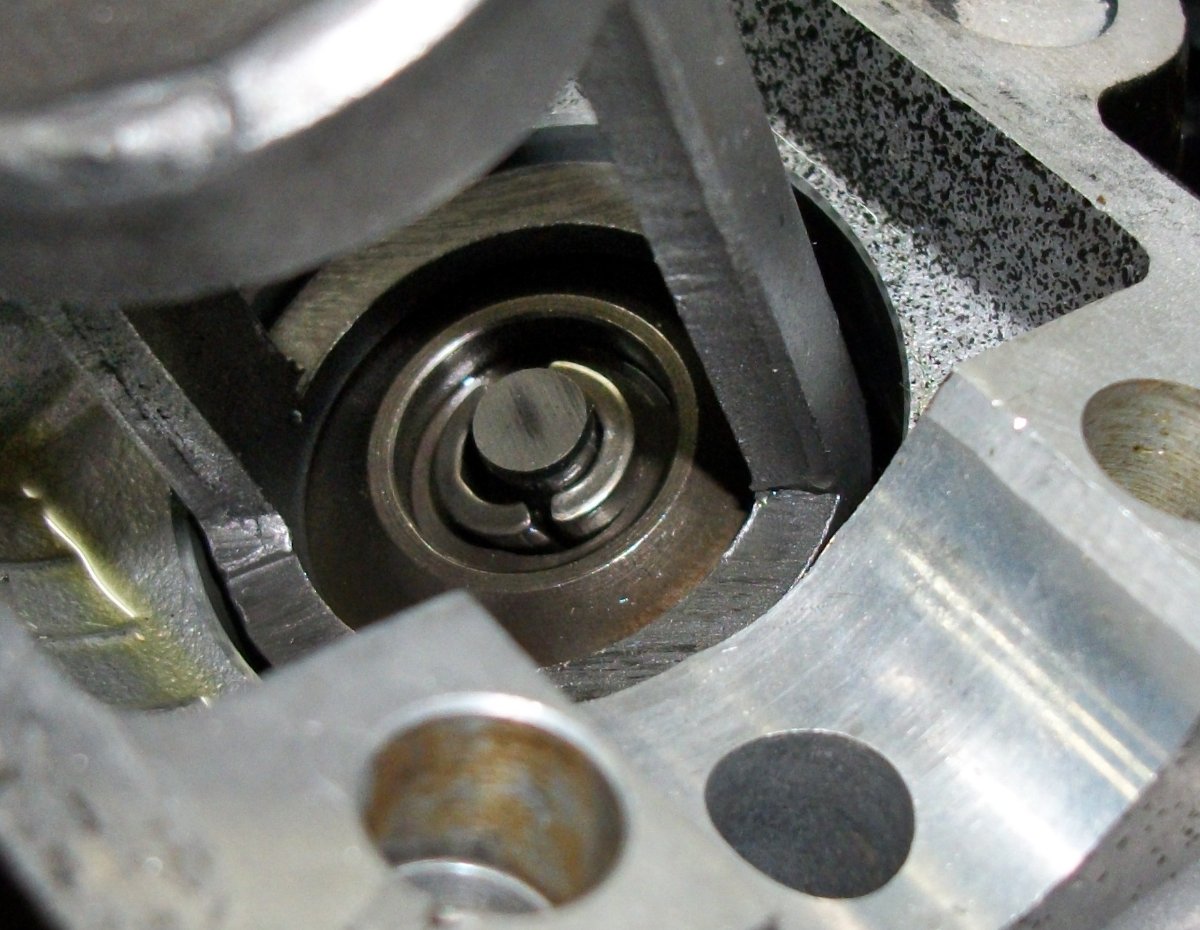
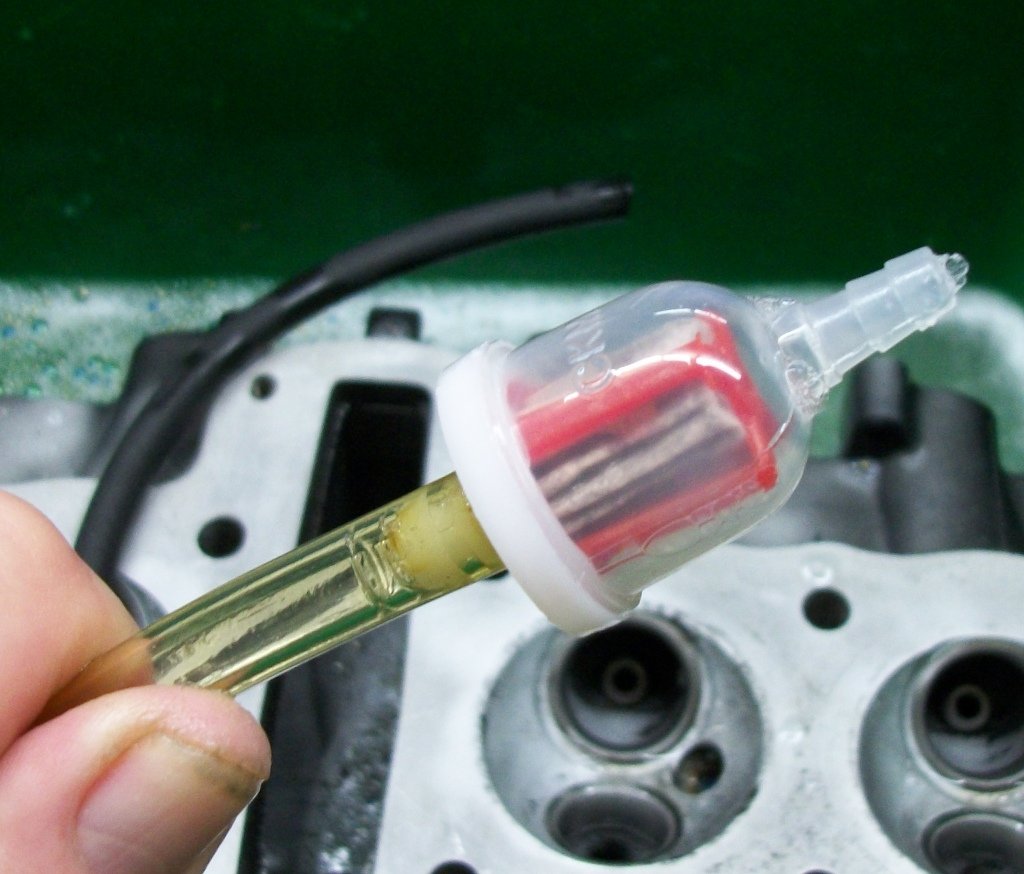
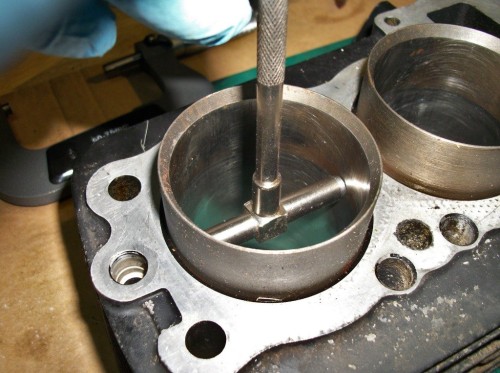
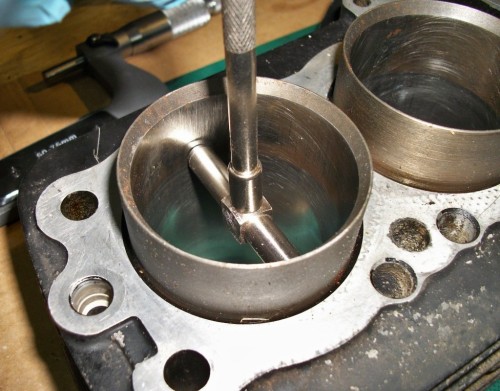
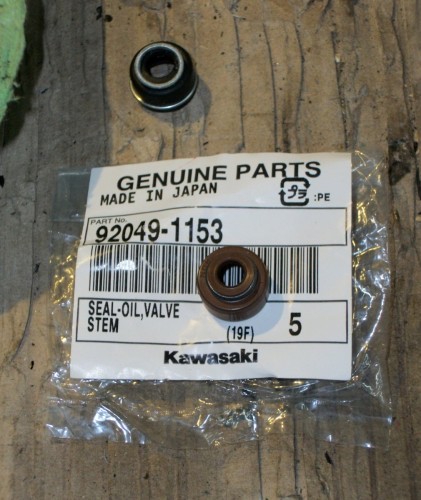
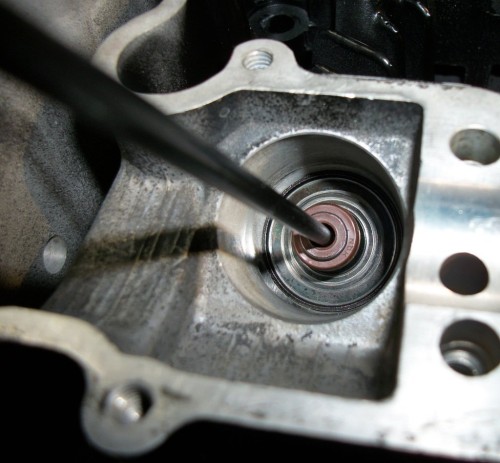
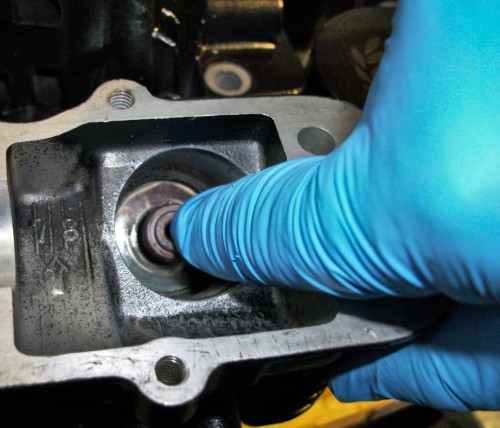
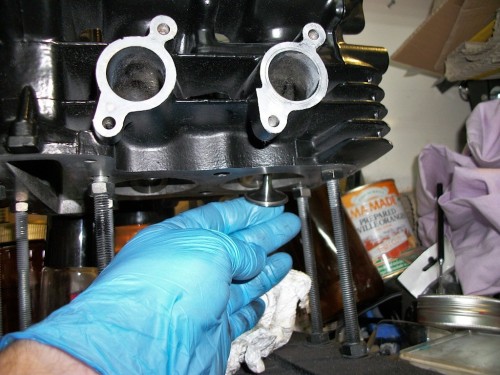
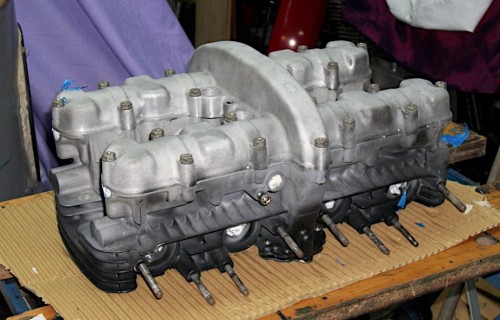
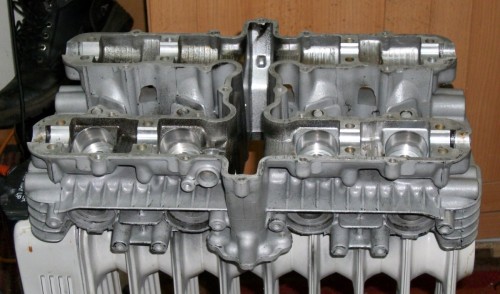
Valves ready for installation. More time in the shed this week. Seals arrived in a few days, nice quick post from Europe. Here you can see the difference between OEM seals and pattern ones. The Kawasaki part number is: 92049-1153 which replaced the earlier part number 92049-1050 both these seals have the following dimensions 5.5 X 12 X 6 X 9.8mm. The pattern seals have a hole for the valve at 6.0mm, so oversize. The old seals are from a pattern gasket set I bought 4 years ago, a Vesrah one but still the seals are not correct. Always use OEM seals and head gaskets. After a good whizz round with a alcohol soaked rag the head was placed on the stand and the new seals greased with Red Rubber Grease. Located with the paint brush (non brush end obviously). and pushed on Valve oiled and inserted from below. Springs, top retainer in, springs compressed and collets fitted. Before unscrewing the spring compressor I find it a good idea to place some cloth over the collets to stop them pinging out. The other 7 valves were fitted in the same way. Head was now covered in bubble wrap and stored out of the way. The Exhaust studs and inlet boots will be done last to avoid damage (to me if not them) Exhaust studs are with the rest of the bolts in the to zinc plating que. Pistons off next


-
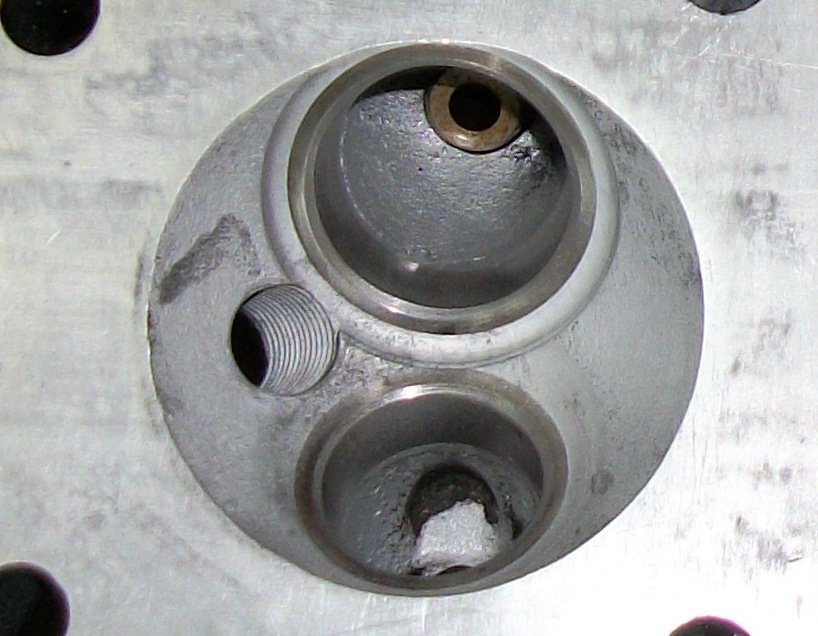
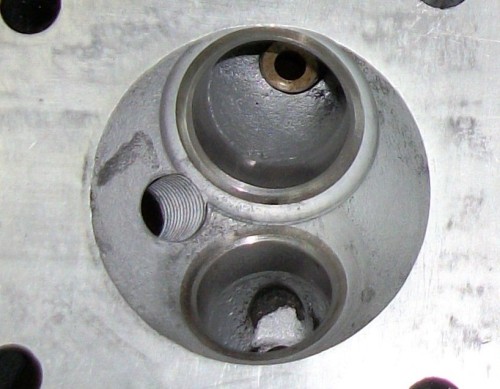
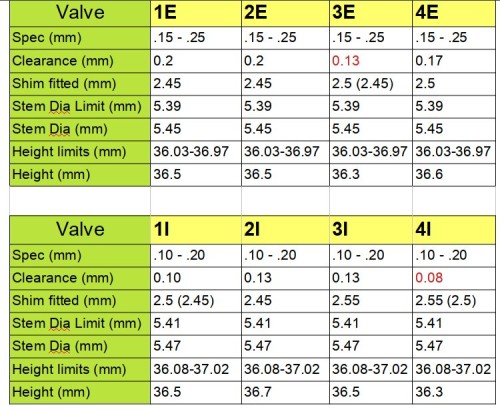
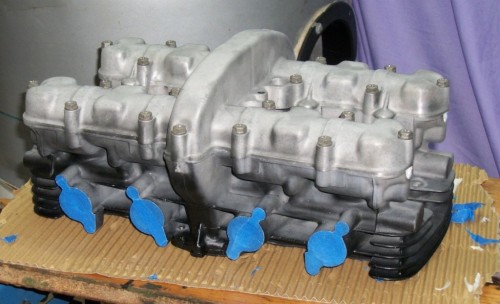
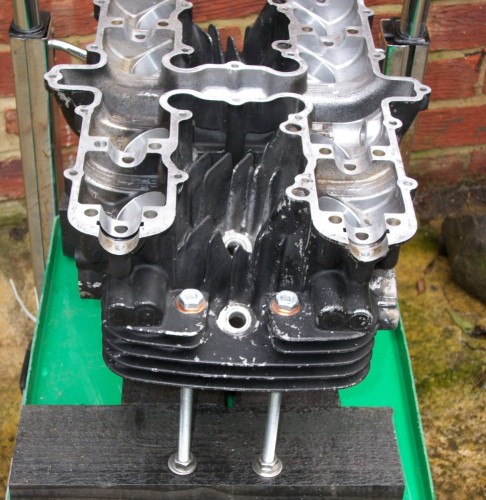
After a good Christmas break it's back to the shed. Left the lacquer to harden before final check, clean and rebuild. Very pleased with the job so far, this my spare head with valve guides just in spec. Got the number of a local guy to make up some Phosphor Bronze guides for the original head. No 2 Combustion chamber before No 2 Combustion chamber after You can see that soda blasting makes short work of getting rid of the carbon deposits. Valves lightly ground in, fitted with springs just compressed then tested with water in the inlet and exhaust and air line blown around the valve face, no bubbles, lovely. At this point I checked the seals and gasket box and I had not ordered any Valve stem seals. MPS (https://www.motorcyclespareparts.eu/en) had a 10% offer so ordered the seals, 2 engine bolts and some rear sprocket tab washers (the Z500 rear sprocket is held on with 4 bolts not 6 as with the 550). So while I wait will have to find another job to get on with In the meantime here is the measurements relating to the valves. You can see the valve heights are all well within spec, should hope so as they have only ever had a light grind in. The only thing to look at is the No 3 Exh valve and No 1 and 4 Inlet clearance, will look through my shim collection to get them in the middle of the recommended settings. Till next time...

-
Heatwave then!! Out you go...
-
Had a few days off this week. Did the GS125's mid winter clean and inspection (F Caliper clean, oil and filter/strainer, tappets, carb clean, air filter wash/re oil, chain clean and re oil, R brake and centre stand pivot lub, batt top up and charge) Finally re apply ACF 50 with small brush and cloth. As usual had to replace the split gaffa tape on my seat, will have to find a good one this summer (seat not gaffa tape) YES, I know the shed needs a tidy. Overall it is looking well, this is it's 5th winter with me. ACF 50 and a rinse off is working well. Oh before I forget, tyres and treads get a good scrub with hot degreaser each week when the roads are damp and salty. it makes a quite a difference if you do a lot of town riding. There are a load more diesel vans and trucks about over the last 10 years (well maintained or not) and IMHO coating our roads with deadly lubrication. Rant over. Happy 2020 all Rob B

-
Cheers, will post more v soon Rob
-
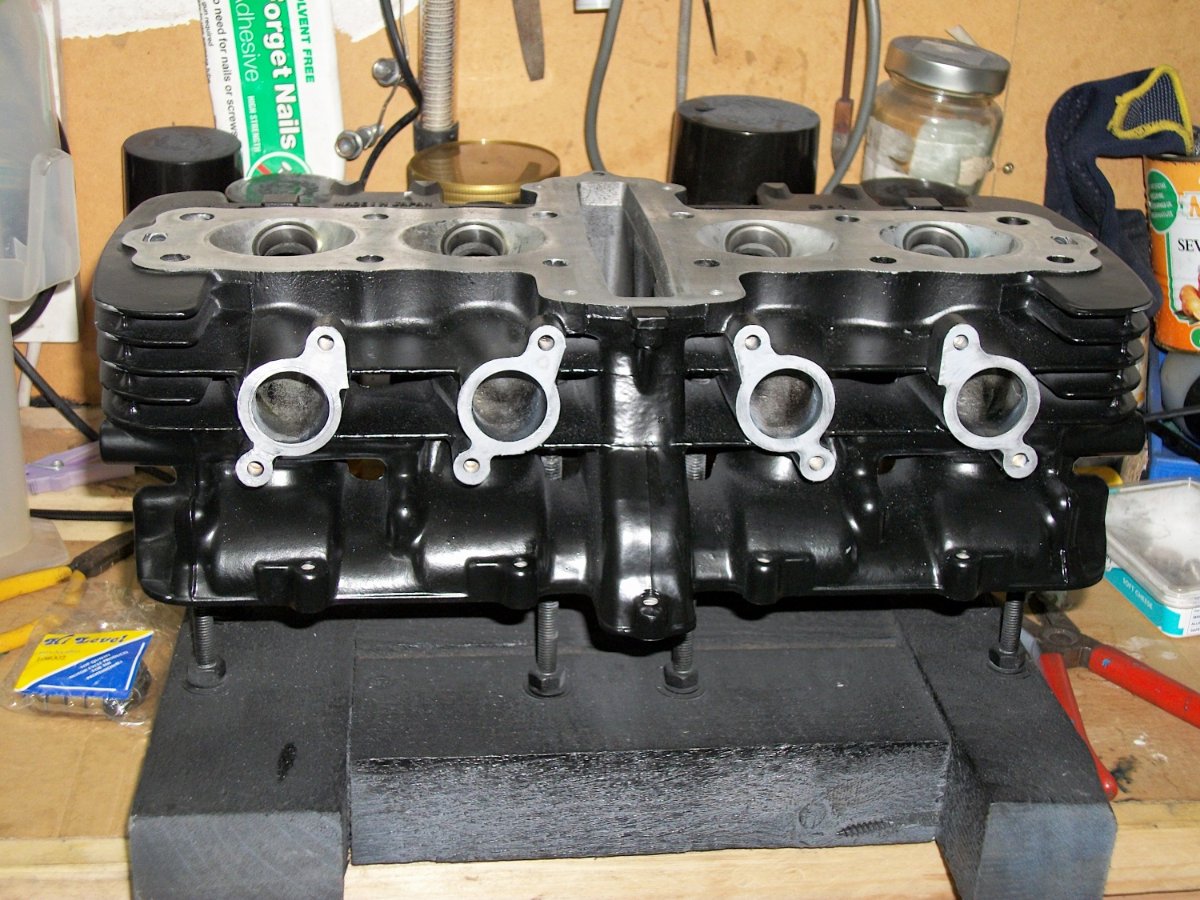
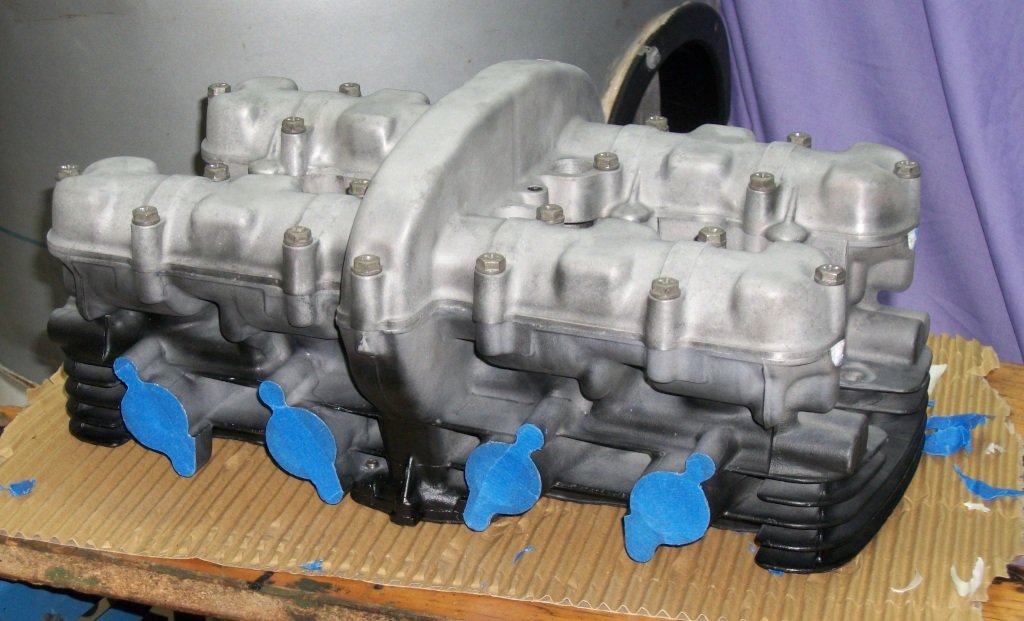
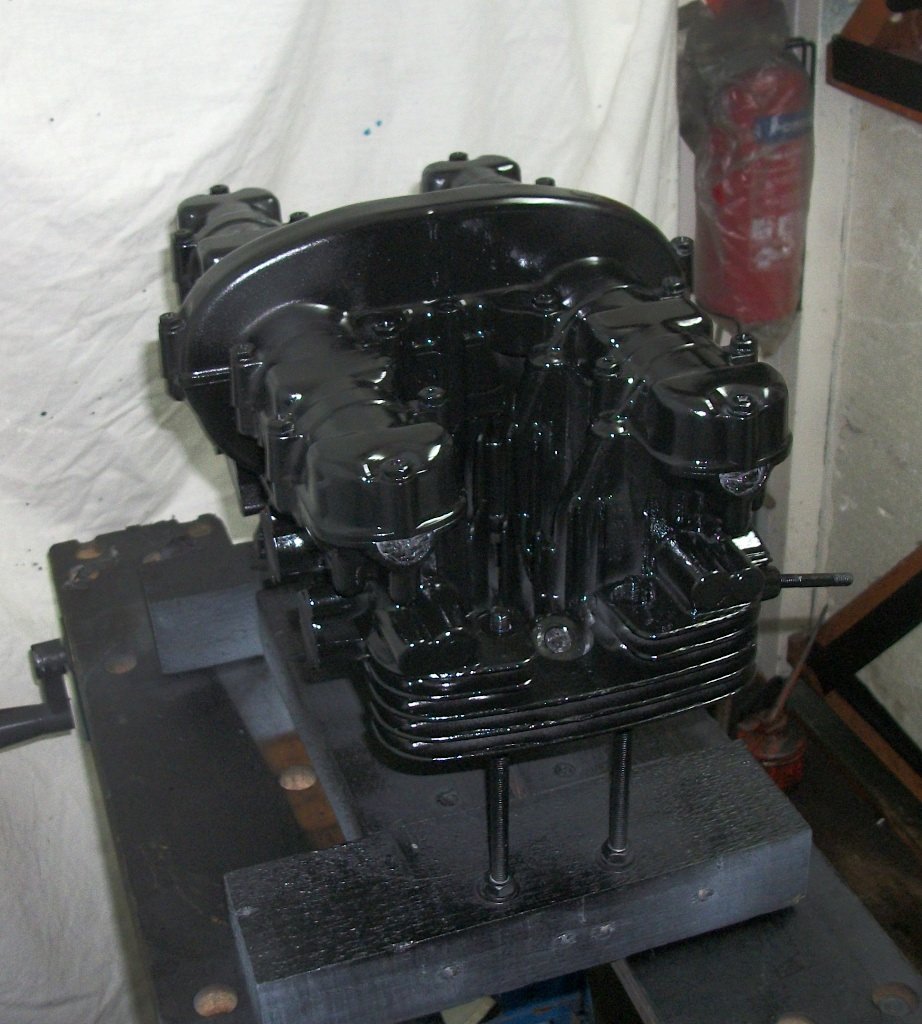
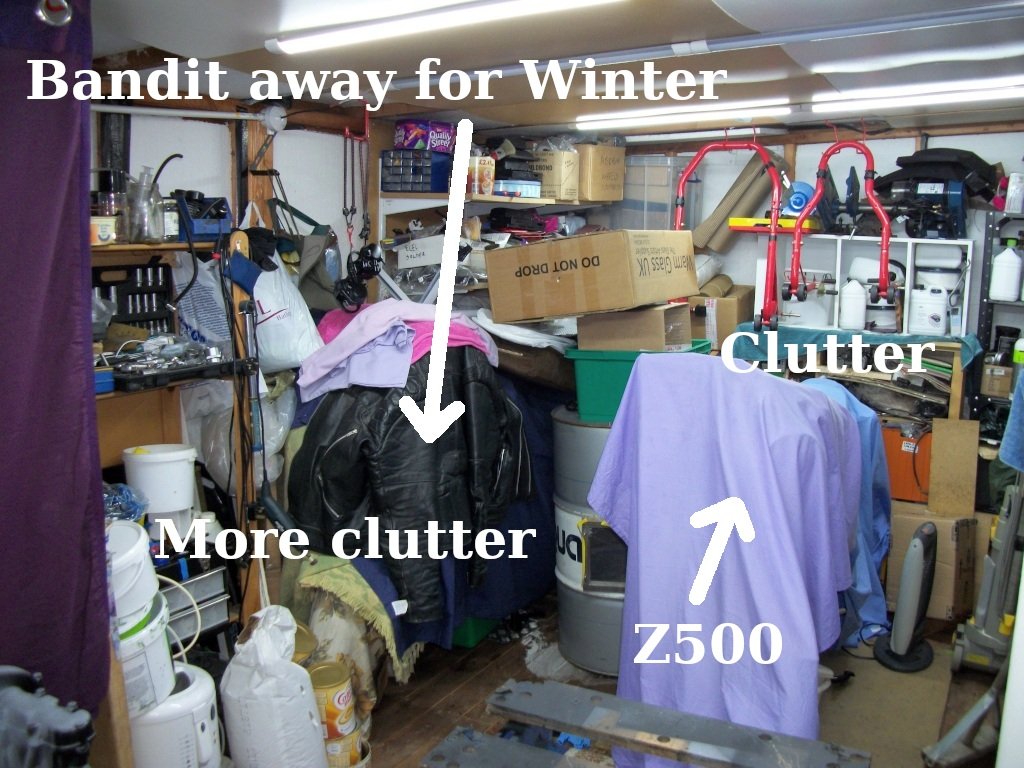
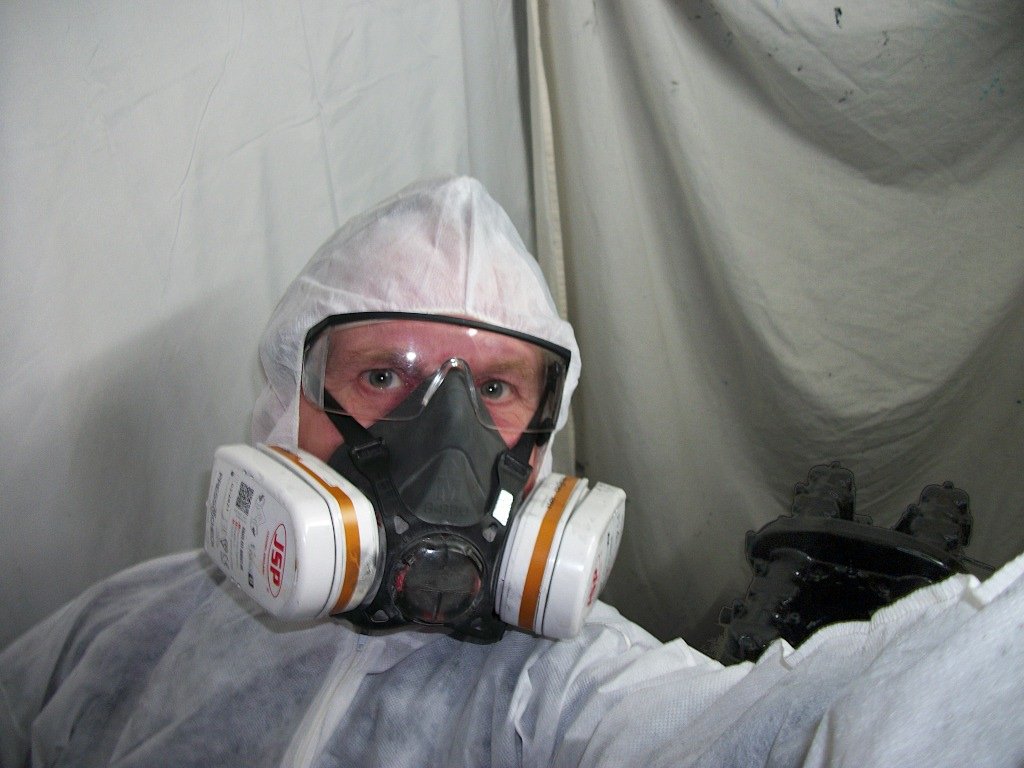
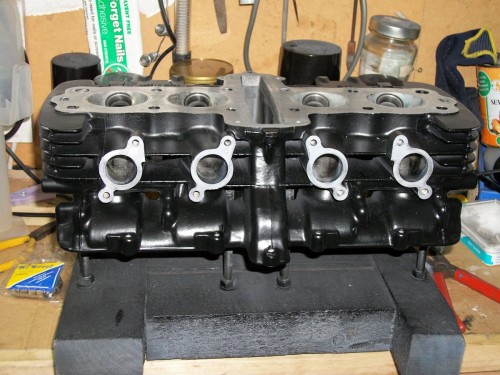
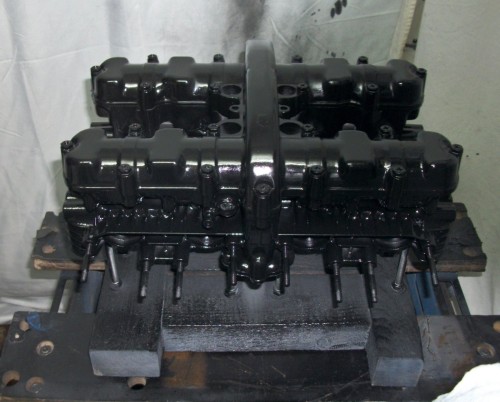
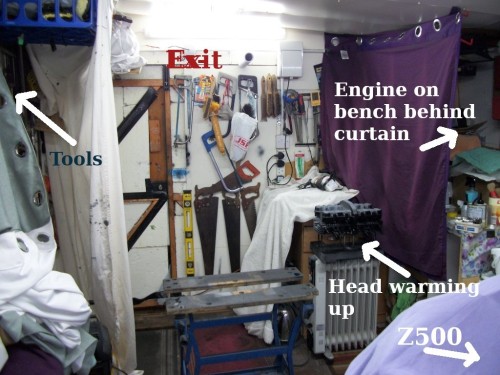
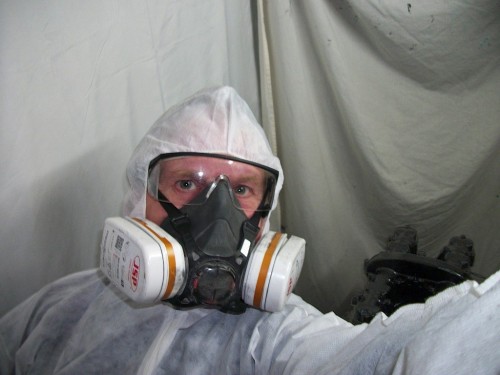
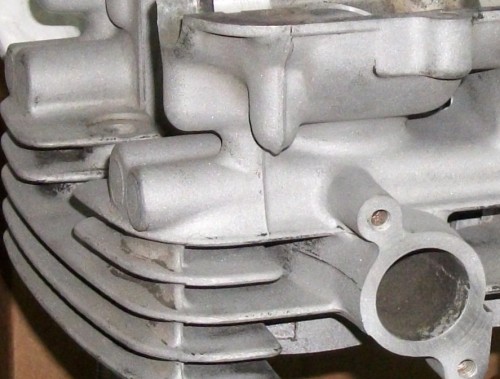
Nov 27th update, better late than never I got the heater on in the shed and used up the last of my Satin Black paint on the cylinder head. The masking and etch priming was done a few days ago so was ready to apply some colour. Masked primed and bottom coated with Satin Black, this is an old can of Wilko's Satin Black enamel. Below with a just a mist coat of black, old bolts and exhaust studs screwed in and old head gasket used. Mist coat dried followed by a medium wet coat and 2 wet coats. left to dry then turned over. This is where my can ran out. Will let is harden and have a close look at the finnish and decide if Wilko's Satin black is to used to finish off the head and then the barrel. While we're here this is my shed as I was preparing for today's painting with the GS125 outside in the cold. Finally, yours truly in suitable attire. Rob B


-
Well said Bob
-
Missed that real time journey Bob, will look out for the inevitable repeat. I have watched a few of this type of show and even tried to watch Mr Cole and his mate a few times. I prefer a few guys on Youtube: Really random : https://www.youtube.com/channel/UCKWkhqAHjW4x2oRK_yzpxlA/videos The doghouse, a really good fabricator: https://www.youtube.com/channel/UC3XpxkSvafEP1GjMeCztEFA Matt Hudson's The Workshop : https://www.youtube.com/channel/UChYdD3BgfawTdKlnUJBeOMA Cheers rob B
-
Interesting tip thanks ! Cheers Ian forgot to mention, use it hot 50-70 C
-
Used a few so called degreasers and nothing water based comes close to Bilt Hamber surfex-HD. Used neat it is brill. for really messy stuff I use Paraffin then a wash down with surfex-HD diluted 5 or 10 -1. Bit pricey but is kind enough to Aluminium and plastic and rubber. Get it in the 5Lt bottle lasts ages. Rob B
-
i bet you are sick now A good bike but no way on Earth are they worth the money some people will shell out for. The blue N reg (SVY557N) CD175 I PX'd for the first 400/4 was in about the same condition as one I saw at Stafford last year and they wanted £1995 !!!. My winter bike, a red CD175 I had in the early 80's was in great nic but almost had to give it away in the end. Blokes of my Dad's generation were probably saying the same about Bantams and Tiger Cubs going for silly money.
-
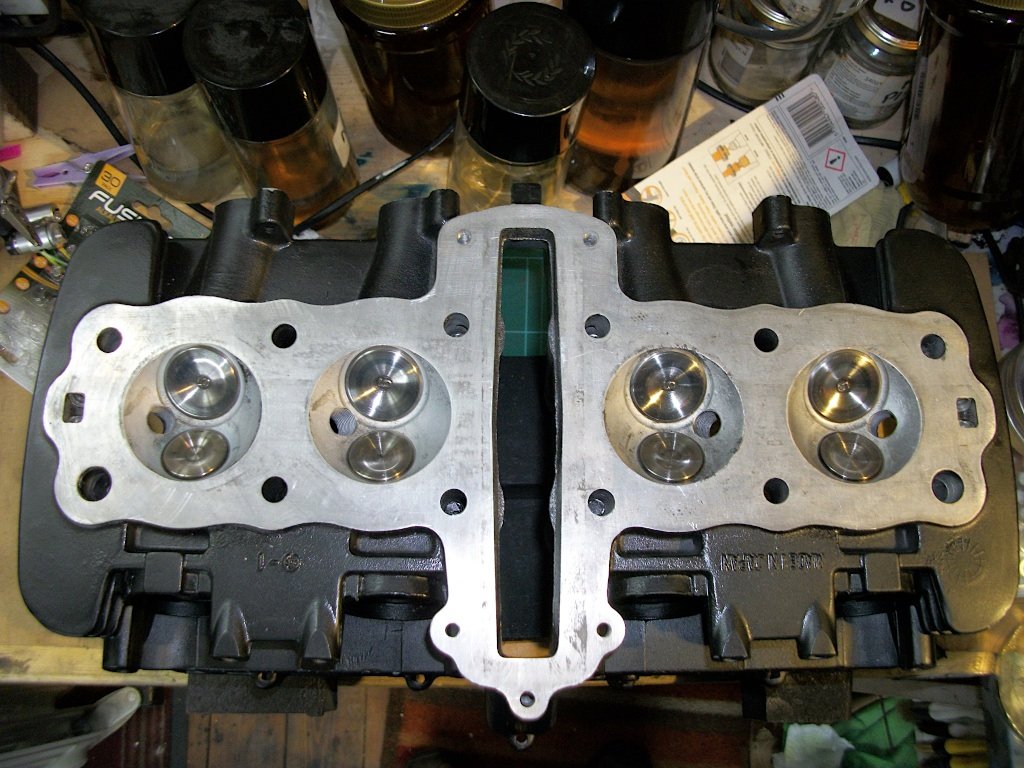
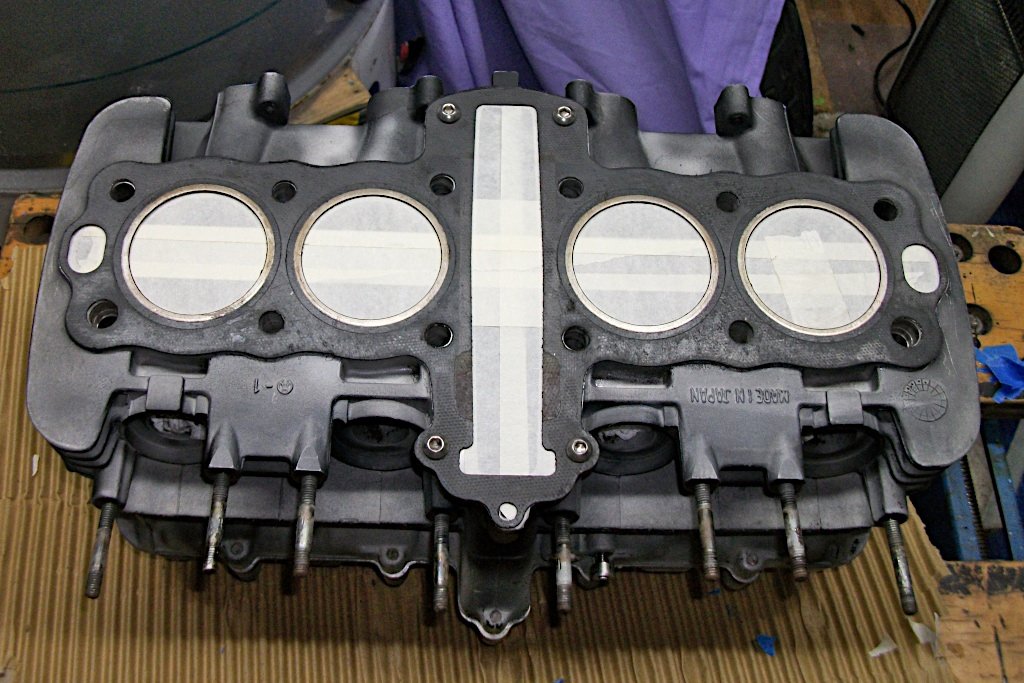
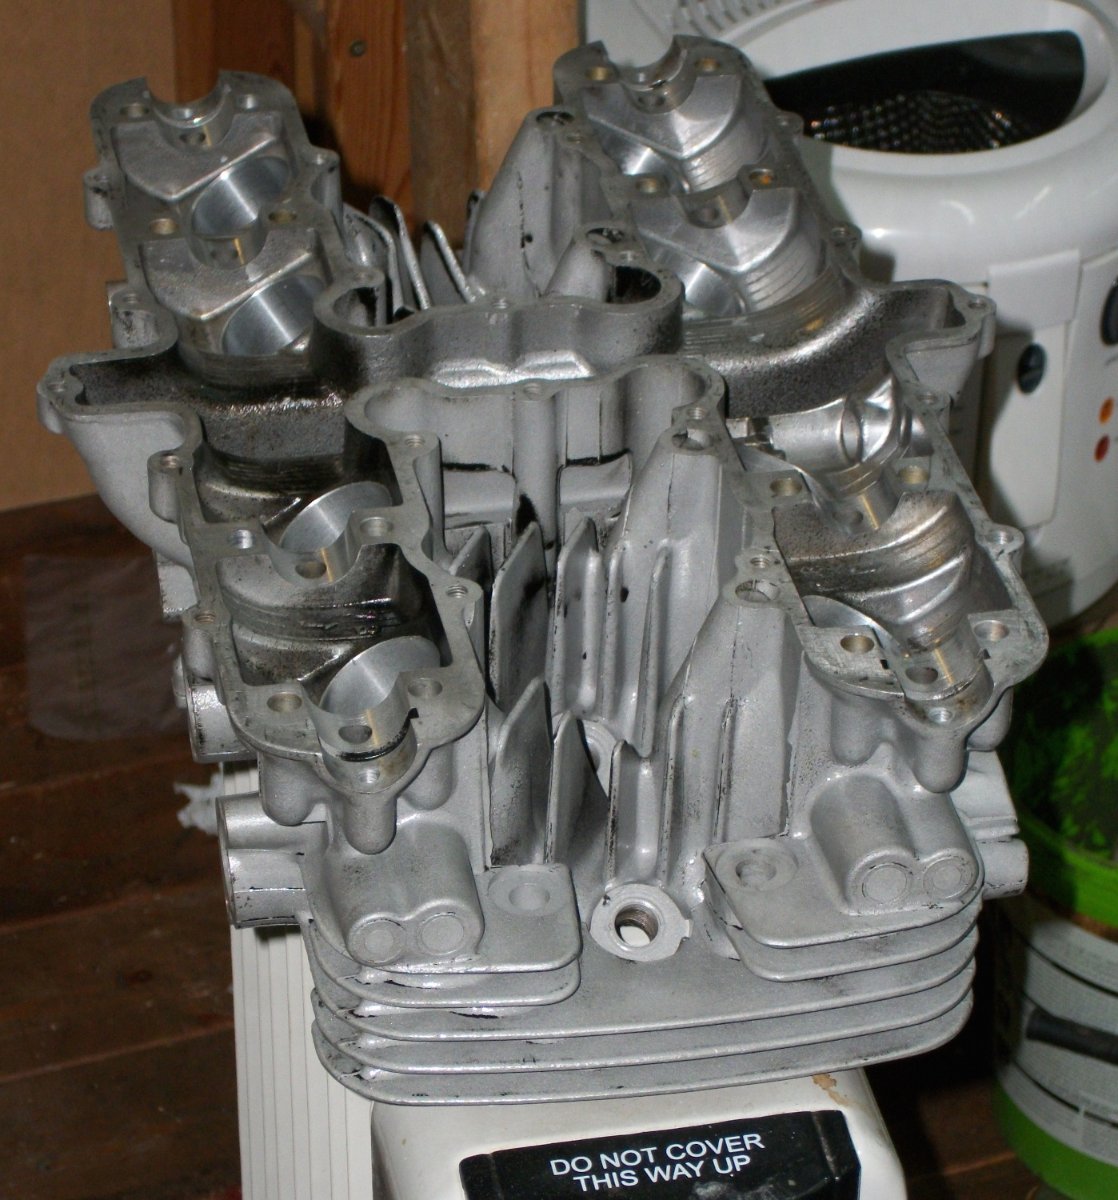
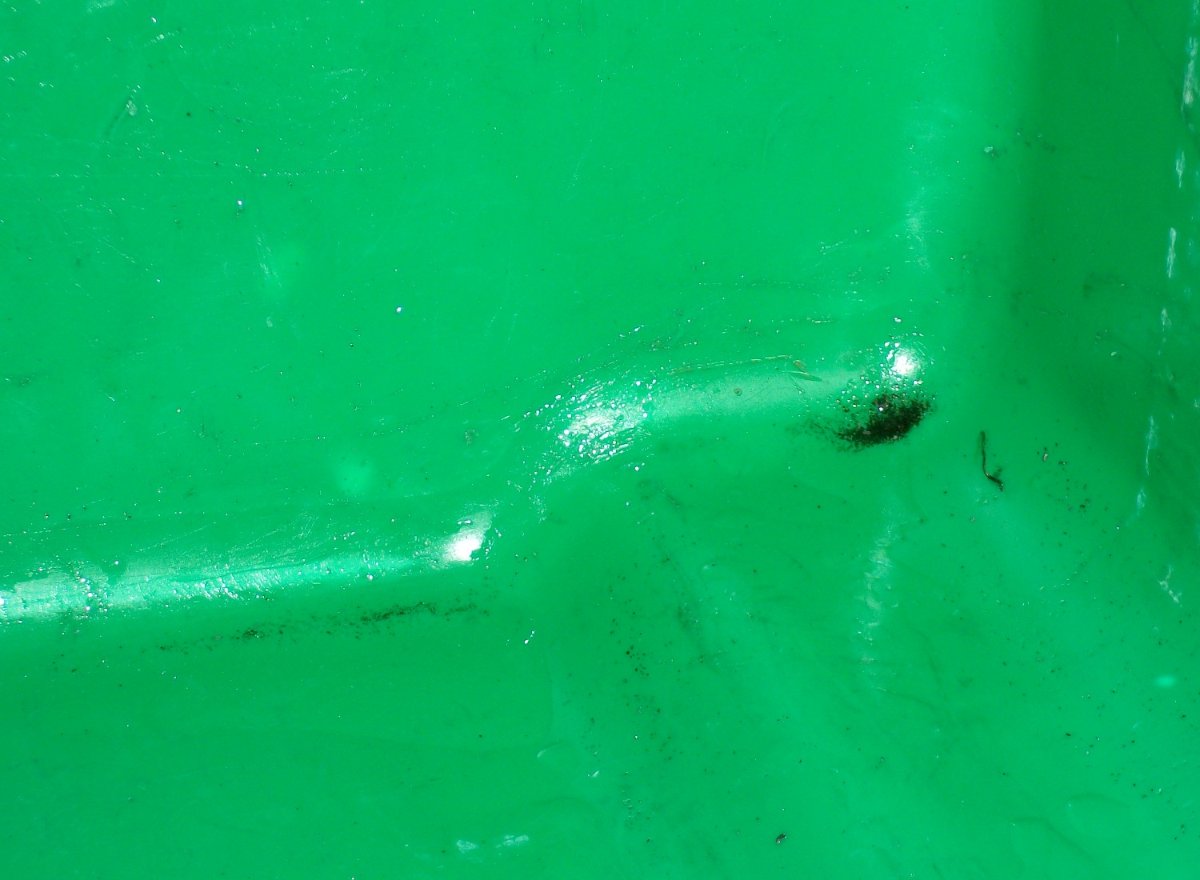
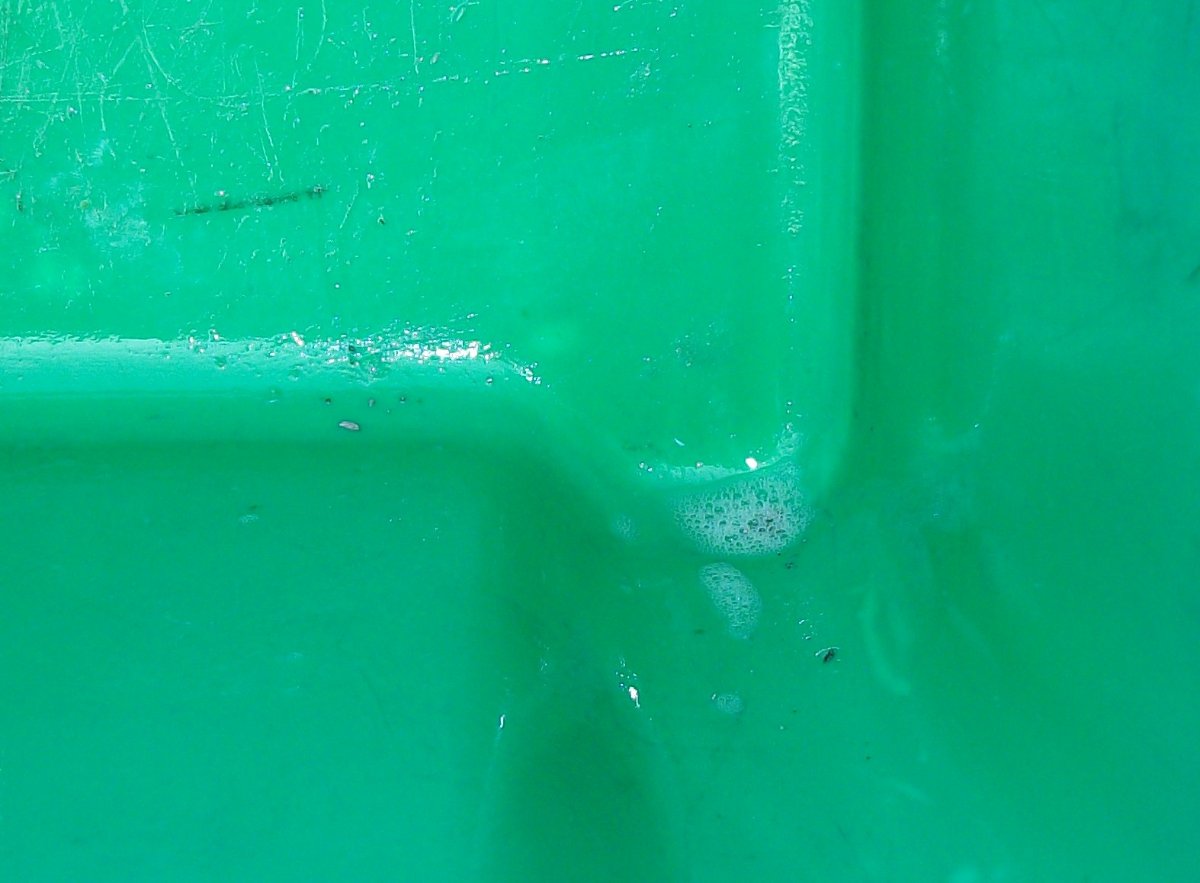
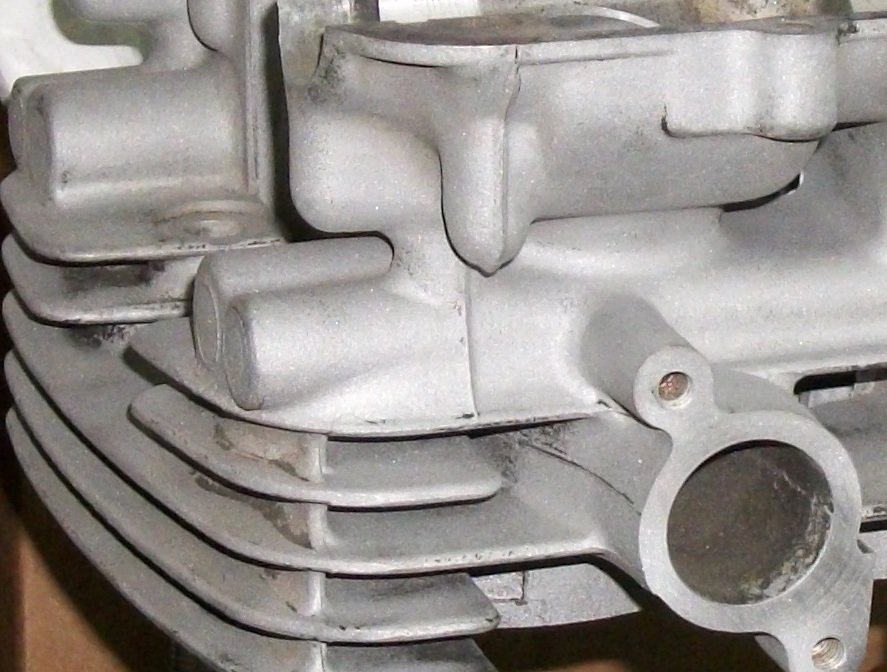
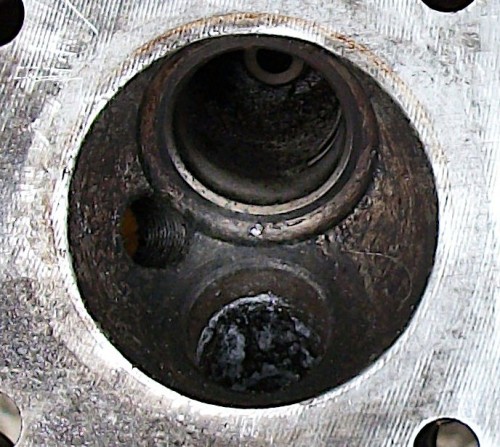
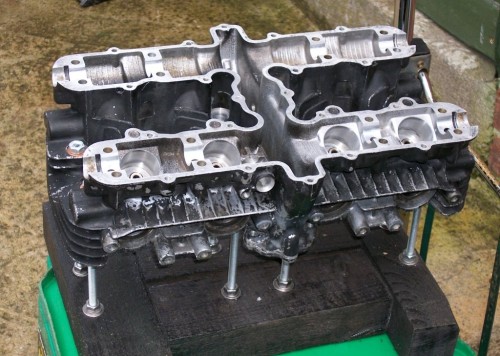
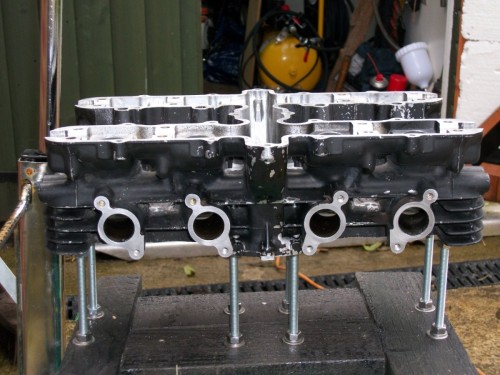
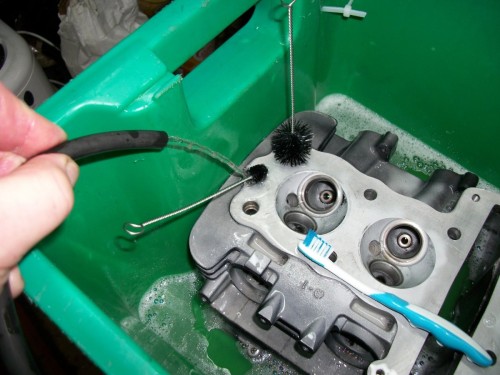
Well finally got on with the jobs to do. Cylinder Head Clean and Blasting. The easiest (costly) option was to send it with the cases barrel etc to Tiger blast nr York for vapour blasting but being a stubborn bugger and wanting to do as much as possible myself, besides the weather is rubbish and nothing on the telly. Before blasting the head was washed with small tooth brushes in diesel and then with scotchbrite in hot soapy water, after drying it off with the air line used 2 coats of paint stripper, then washed 2 more times and airline dried. The combustion chambers were blasted with soda and came up great. The remaining paint had to blasted with the fine black grit I got from the media suppliers in Newton Aycliffe. Had to be very careful not to go anywhere near the bearing surfaces but even plugging a lot of it up the blast media went everywhere. After blasting and blowing out with the airline the whole head was washed in diesel then in hot soapy water. A further wash with my power washer was followed by hot clean water and a dry with the airline. It is also imperative the you re-oil the valve guides after each wash, they will flash rust. A further power wash and hot water rinse was carried out followed by 2 more brush washes and power wash until no more debris was left in the bottom of the bowl. It pays to keep washing and rinsing, the power washer set to a needle spray down the oil ways was great but I ended up very wet. When it comes to my spare head, or any other for that matter I will plug and mask everything. The soda is no problem as it dissolves in water but this fine grit was a real pain to get out. I suppose a large hot ultrasonic tank would be a good idea but for me impractical and way over budget (see comment at the start of this post). Painting next Rob B


-
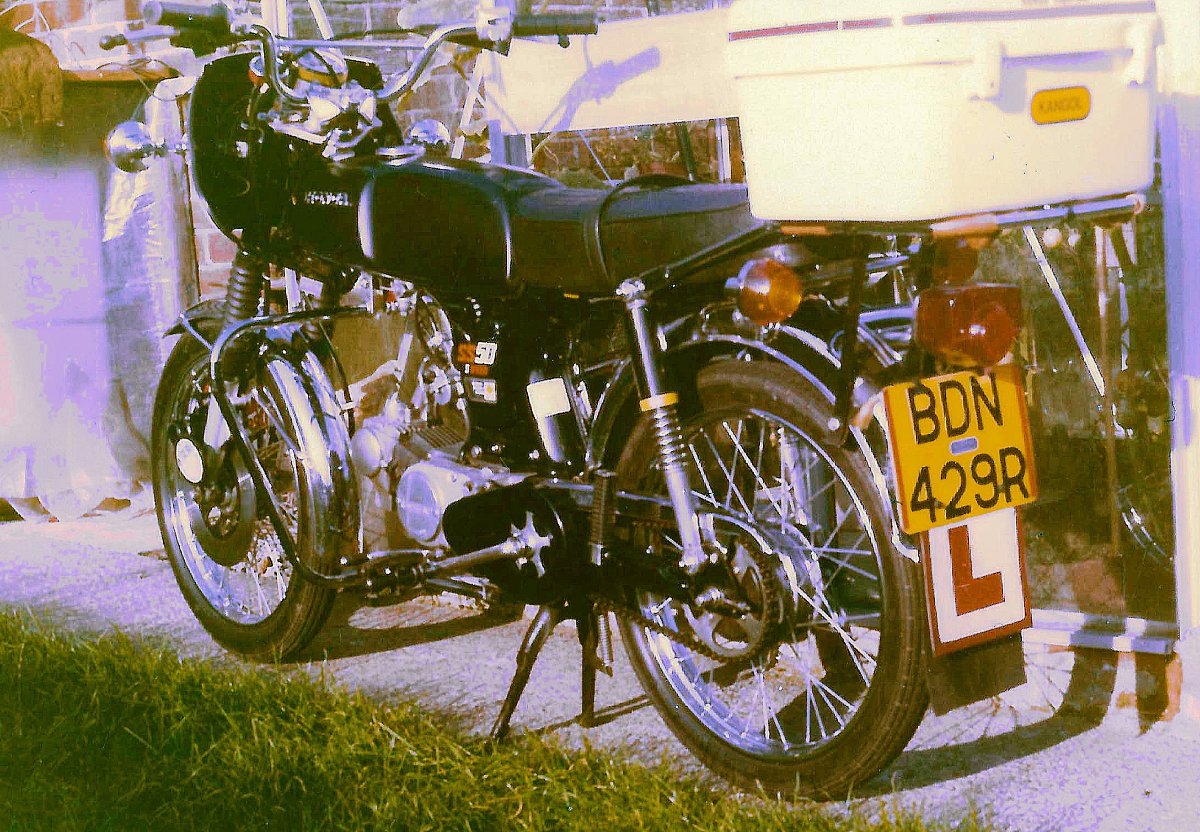
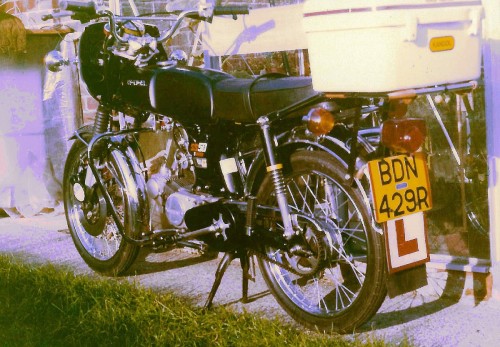
1st road bike this Honda SS50 5-speed 1976, had my CD175. 400/4 and various RD's. Kept it till 1980 and sold it as it was unrestricted for a whopping £220 quid mint Rob B

-
1997 ER 500 restoration
linuxrob replied to fifthwheel's topic in Old Motorbikes, Projects and Restorations
Yep this saddo loves these sort of posts. be very careful with those tyres after such a long time even if they have been in the dark. enjoy the work -
Bridget's Beautification
linuxrob replied to dynax's topic in Old Motorbikes, Projects and Restorations
I do like those strips, gives her a great line. -
Makes the world of difference, look forward to the on road pics next spring cheers
-
bum bum bum bum, esso blue
-
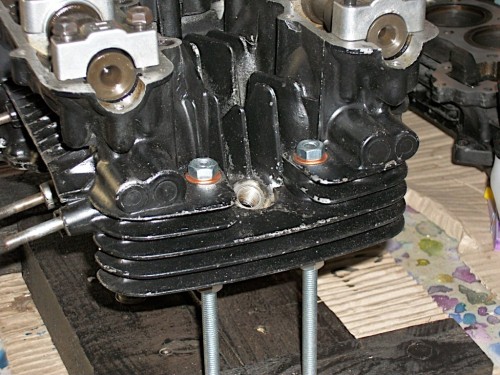
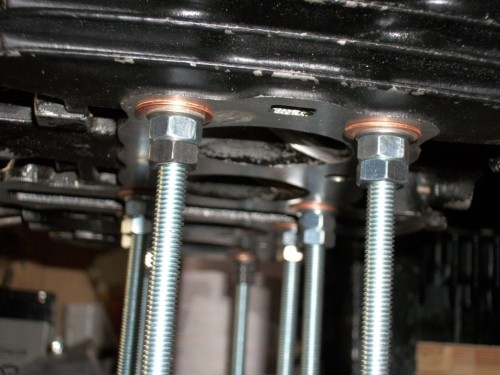
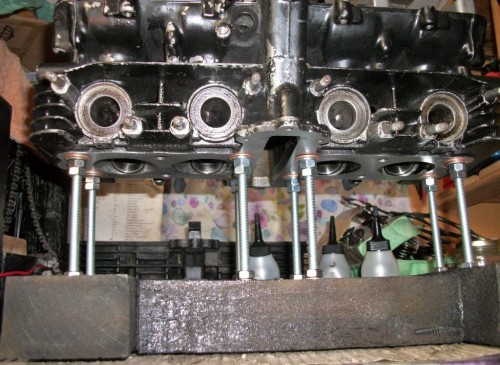
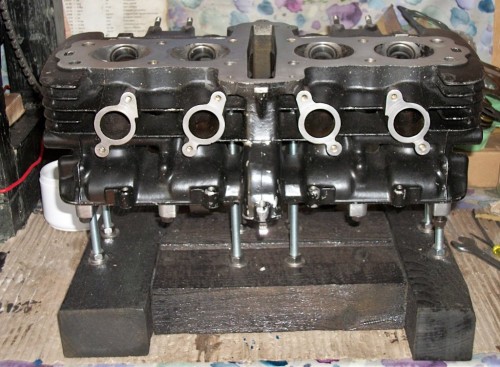
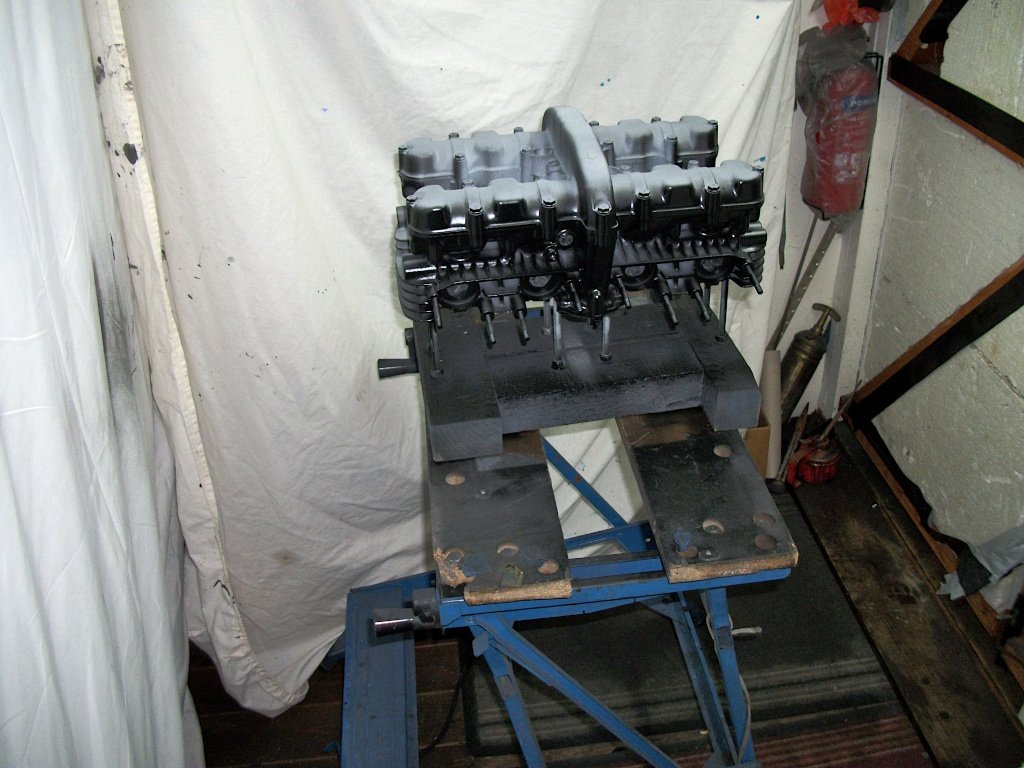
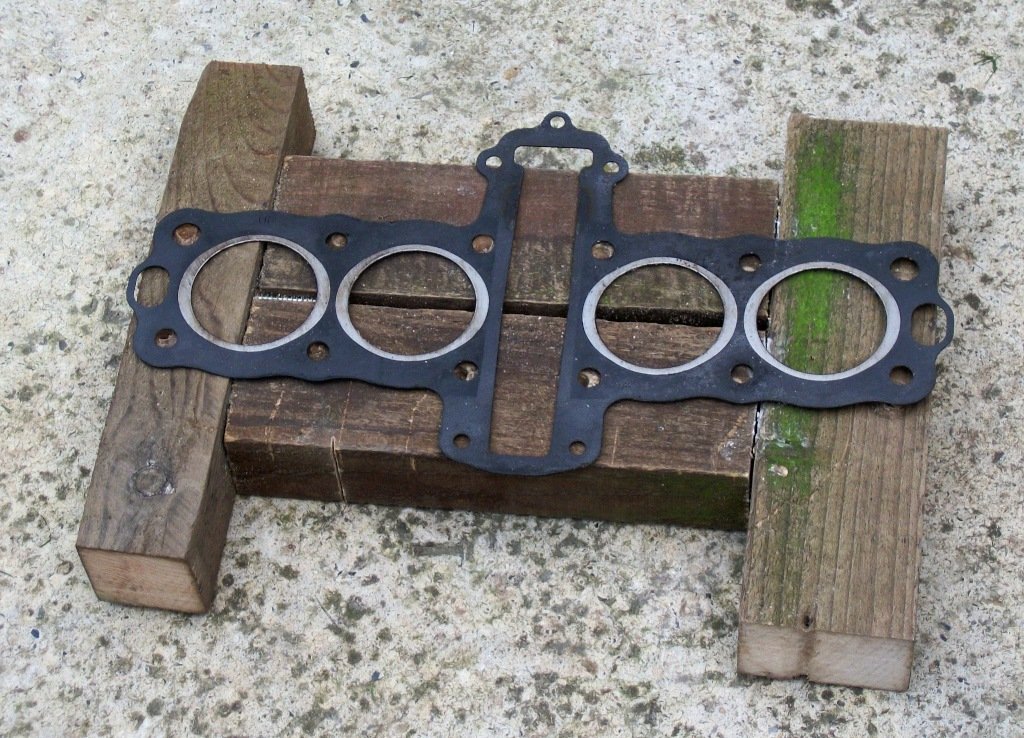
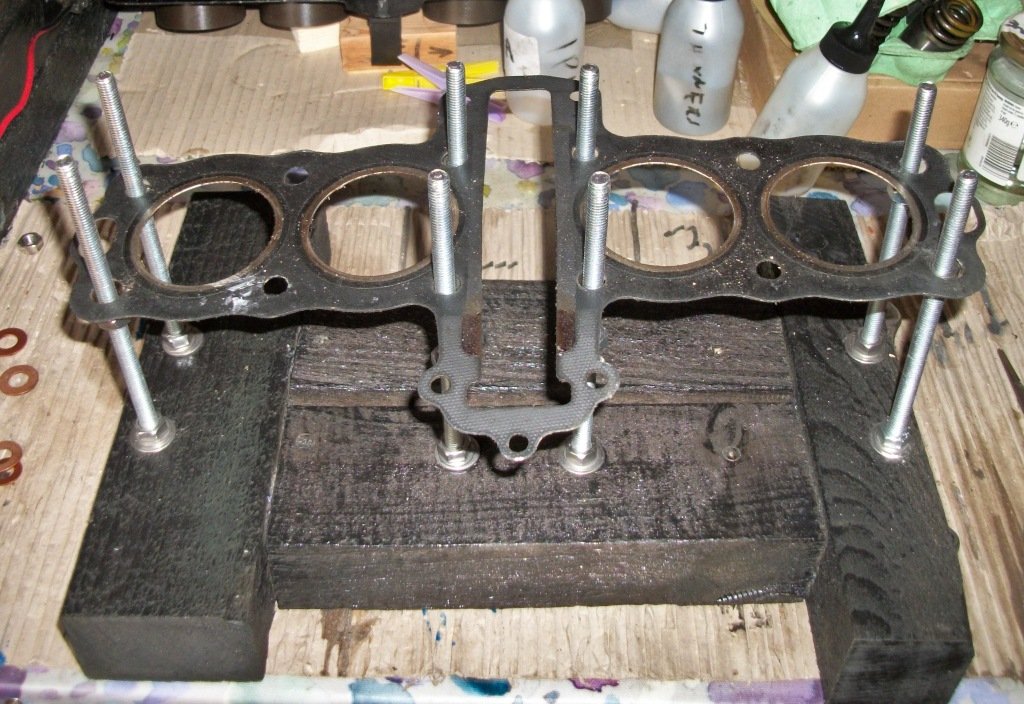
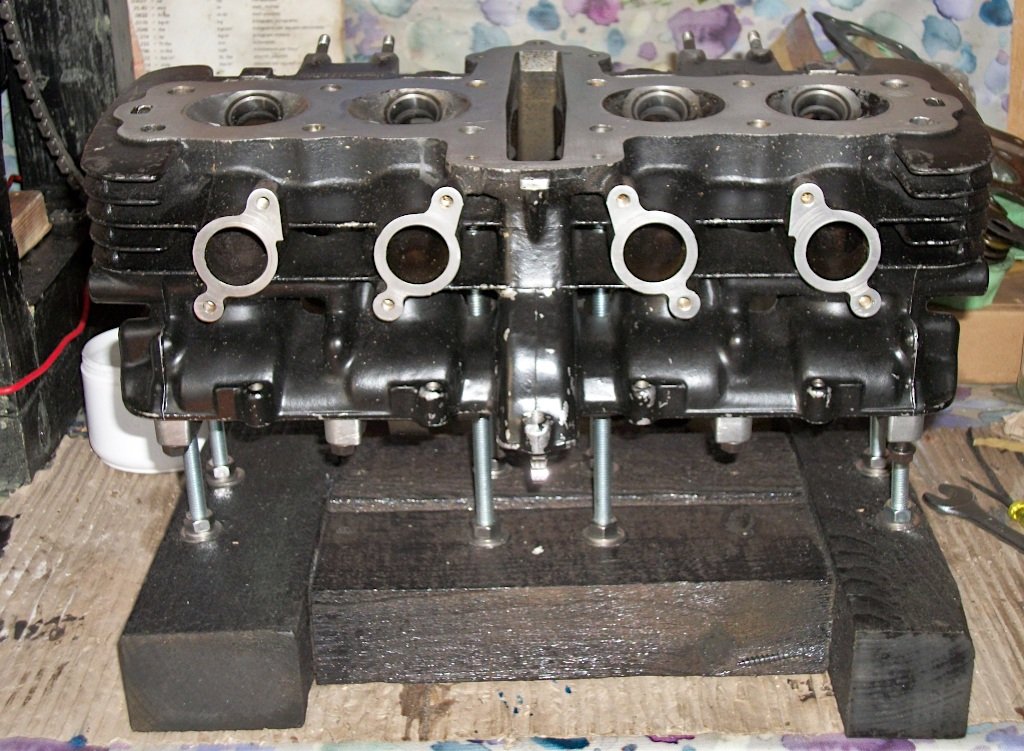
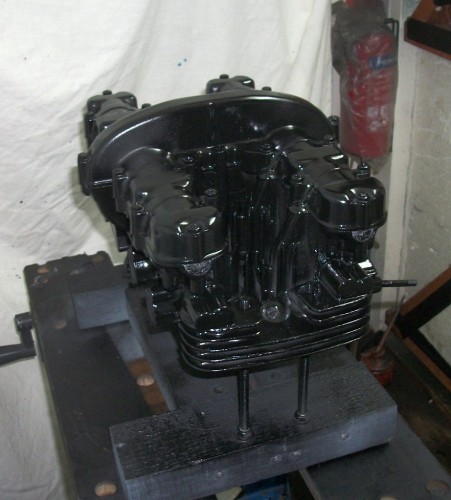
Decided to make a cylinder head stand, used wood as still have some bits of my old gate left. Basically I wanted to have the head raised up from the bench and enough clearance to get the valves in and out plus valve spring compressor in without having to balance the thing on blocks. Seen a few on youtube like a "V" shape in metal but I made just a vertical stand. The wood is a bit thick, made a "H" shape using the head gasket as a template and also marked out the holes for the studs. Have a dozen 8mm coach bolt 200mm long left in my bolt draw and using my drill press made 8 holes. 8.5mm wide. I used the center 4 holes and 4 outside holes of the head. Fitted the bolts with the head gasket keeping them aligned and tightened them down. Ran 2 M8 nuts down each stud then 1 x M8 steel washer and 1 x M10 copper washer to approx the depth to give me a full nut sticking out the 4 outside head mounts. Copper washers of course to prevent any scoring of the Aluminium head, hand tight to stop any distortion. even supports the head upside down for combustion chamber cleaning and valve lapping. Good result. Now to get on with some work. Rob B